

Start Your House Window Replacement With the Right Plan
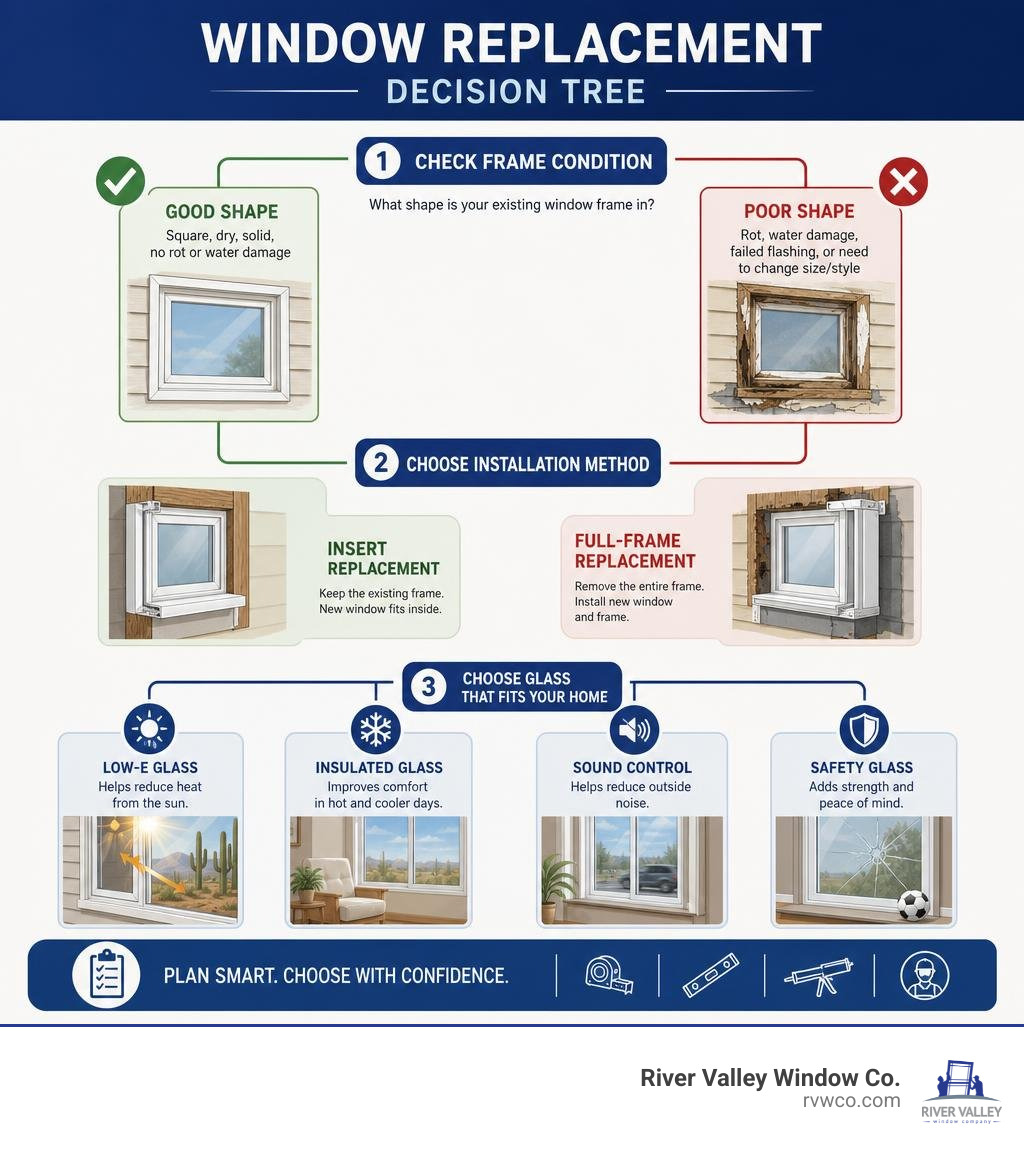
A successful house window replacement starts with the right installation method. Choose an insert replacement when the existing frame is square, dry, and solid. Choose a full-frame replacement if you find rot, water damage, failed flashing, or need to change the window’s size or style.
Before ordering windows, take these steps:
- Check each window for drafts, fogging between panes, sticking sashes, and soft wood.
- Measure every opening carefully and decide whether the old frame can stay.
- Match the frame and glass package to Northwestern Arizona’s heat and sun.
- Get written quotes that separate window cost, labor, trim, repairs, permits, and disposal.
New windows can lower air leaks and improve comfort, but correct measuring, flashing, shimming, insulation, and sealing matter just as much as the window itself. This guide walks through the process so you can plan the job confidently, whether you hire a pro or need to compare installation quotes.
Handy house window replacement terms:
Planning Your House Window Replacement: Costs, Methods, and ROI
When planning an upgrade, mastering how to budget for window replacement for your home prevents surprise expenses down the road. Recognizing the primary signs it is time for window replacement—such as escalating cooling bills, physical decay, or failing seals—ensures you tackle the project before structural framing incurs moisture damage.
Evaluating Insert and Full-Frame House Window Replacement Options
Selecting the right scope dictates your overall budget and timeline:
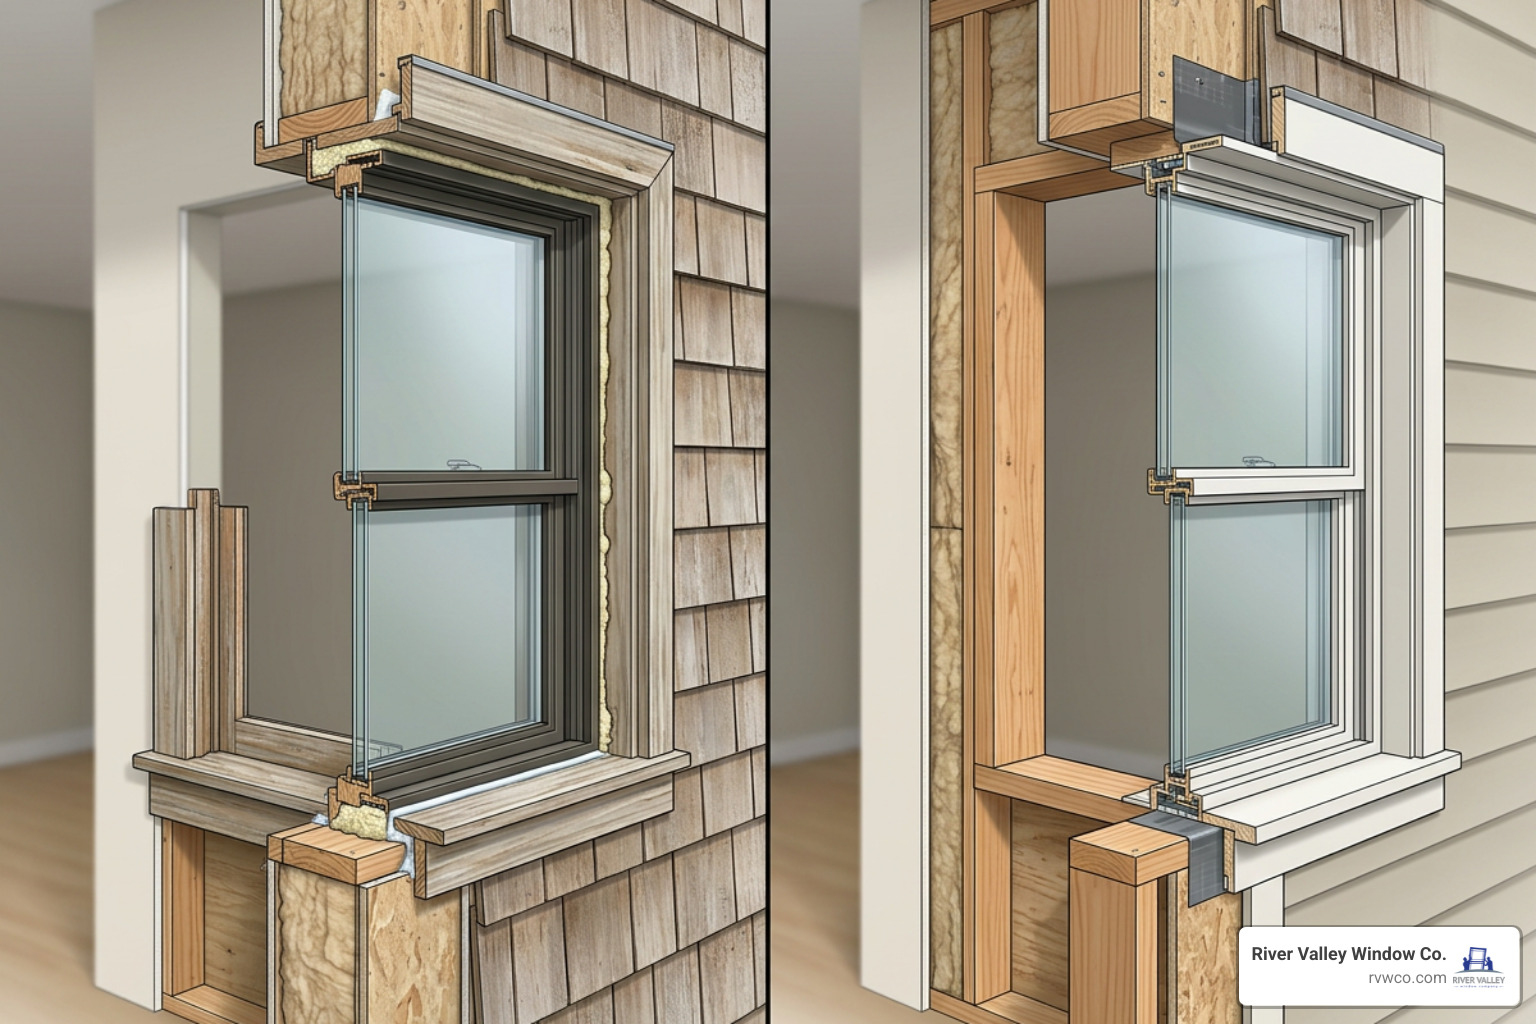
- Insert (Pocket) Replacement: Drops a new, fully assembled window unit directly into the existing structural frame. Installers remove only the interior stops and sashes, leaving exterior casing, interior trim, and water-resistive barriers undisturbed. This method takes 1 to 2 hours per window and represents the most cost-effective path when existing jambs and sills remain square, plumb, and rot-free.
- Full-Frame Replacement: Strips the entire opening down to the rough structural studs. The crew removes exterior brickmould or stucco trim, tears out the legacy sill, repairs underlying framing damage, installs new sill pan flashing, and integrates fresh weatherproofing. While requiring 3 to 5 hours per opening, it delivers a total refresh and lets you reconfigure window dimensions.
How Much Does Whole House Window Replacement Cost in 2026?
In 2026, a standard residential window replacement runs between $650 and $1,800 per window installed for vinyl, with fiberglass averaging $900 to $2,400 and wood-clad units spanning $1,400 to $3,500. Labor typically accounts for 25% to 40% of the invoice ($100 to $350 per window for inserts; $200 to $700 for full-frame).
For a whole-house project (15 to 25 windows), total costs generally land between $11,000 and $45,000. Upgrading an entire home at once often secures volume discounts of 15% to 25% compared to tackling single rooms piecemeal. Homeowners can consult our detailed guide to comparing vinyl window costs to navigate line-item breakdowns.
| Window Frame Material | Insert Cost (Installed / Unit) | Full-Frame Cost (Installed / Unit) | Whole-House (15 Windows, Insert) | Whole-House (15 Windows, Full-Frame) |
|---|---|---|---|---|
| Vinyl | $350 – $1,100 | $550 – $1,700 | $5,250 – $16,500 | $8,250 – $25,500 |
| Fiberglass | $700 – $1,600 | $900 – $2,400 | $10,500 – $24,000 | $13,500 – $36,000 |
| Thermally Broken Aluminum | $600 – $1,500 | $800 – $2,200 | $9,000 – $22,500 | $12,000 – $33,000 |
| Wood-Clad | $1,100 – $2,500 | $1,400 – $3,500 | $16,500 – $37,500 | $21,000 – $52,500 |
Choosing the Best Materials and Glass Packages
Finding the perfect balance of thermal performance, aesthetic appeal, and structural durability requires learning how to choose the right replacement windows for your needs.
Frame Materials: Vinyl, Fiberglass, Wood, and Aluminum
- Vinyl: The most popular residential material due to its low maintenance, solid thermal insulation, and competitive pricing. High-quality vinyl carries a lifespan of 20 to 40 years without rotting, peeling, or requiring repainting.
- Fiberglass: Offers superior dimensional stability. It expands and contracts at virtually the same rate as glass, which minimizes stress on perimeter seals. Learn more about the benefits of having fiberglass windows installed, including a 40- to 50-year service life in demanding desert climates.
- Thermally Broken Aluminum: Renowned for structural strength and ultra-slim profiles that maximize natural daylight. Modern designs incorporate an insulated polyamide barrier to mitigate heat conduction. Review the nuances of choosing between vinyl and aluminum windows to match your architectural goals.
- Wood-Clad: Delivers premium architectural warmth indoors paired with extruded aluminum or vinyl exterior cladding. It requires conscientious maintenance and commands top-tier investment levels.
Energy-Efficient Glass Packages and Climate Matching
Glazing performance defines your home’s interior comfort. When understanding single vs double pane windows, consider these core performance metrics:
- U-Factor (0.20 – 0.35): Measures the rate of non-solar heat transfer. Lower numbers mean better insulation against extreme outdoor temperatures.
- Solar Heat Gain Coefficient (SHGC < 0.25): Quantifies how much solar radiation enters the living space. In hot, sun-drenched regions like Northwestern Arizona, a low SHGC is critical to keep air conditioners from running constantly.
- Low-Emissivity (Low-E) Coatings: Microscopically thin metallic layers that reflect infrared heat while permitting visible light to pass through.
- Argon Gas Fills & Warm-Edge Spacers: Non-toxic gas injected between panes slows convective heat transfer, while composite warm-edge spacers prevent perimeter condensation.
Triple-pane glass units add $200 to $500 per window over double-pane setups, improving U-values by 15% to 25% and enhancing acoustic dampening against outdoor street noise.
Step-by-Step Window Installation Process
Flawless execution requires professional-grade equipment:
- Personal protective equipment (safety glasses, cut-resistant gloves)
- 2-foot and 4-foot precision spirit levels
- Tape measure and digital caliper
- Cordless drill/driver and corrosion-resistant framing screws
- Pry bar, utility knife, and oscillating multi-tool
- Sloped sill pan and self-adhering flashing membrane
- Composite non-compressible shims
- Closed-cell, low-pressure window/door polyurethane expanding foam
- High-performance elastomeric exterior sealant
Pre-Installation Prep and Accurate Measuring
Accurate ordering depends on precise measurements:
- Three-Point Width: Measure the horizontal distance between side jambs at the top, middle, and bottom. Record the smallest number.
- Three-Point Height: Measure vertically from the high point of the sill to the top head jamb at the left, center, and right. Record the smallest dimension.
- Diagonal Check: Measure diagonally from corner to corner. If the two measurements differ by more than 1/4 inch, the rough opening is out of square and will require shimming adjustments.
Step-by-Step Installation: From Tear-Out to Flashing
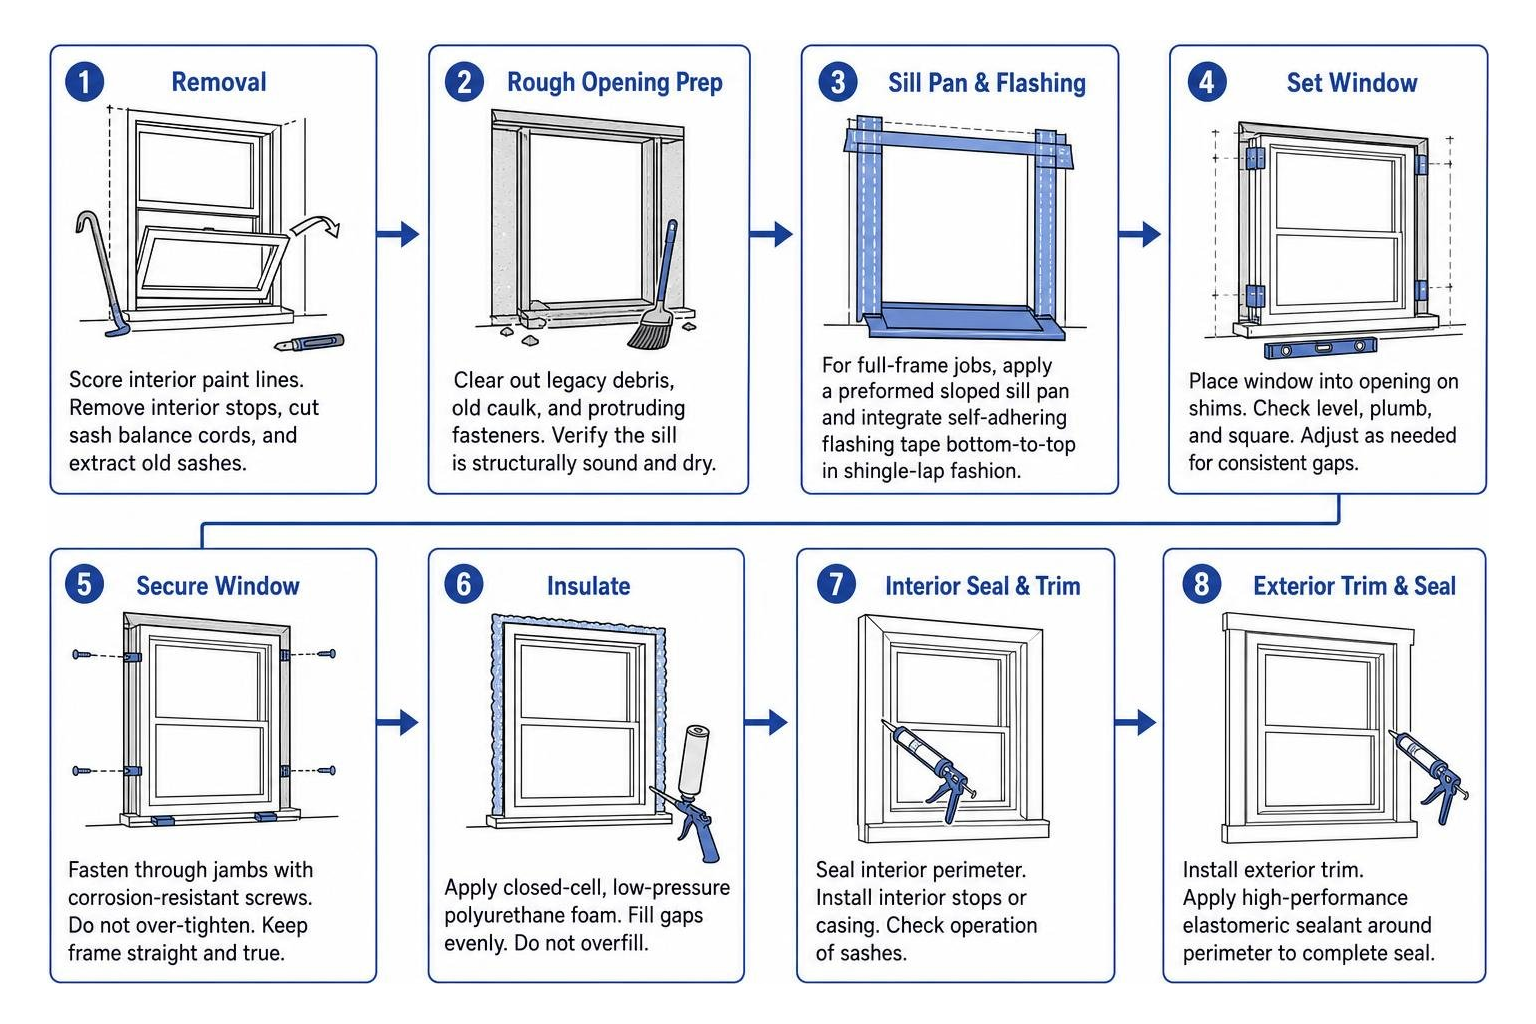
- Removal: Score interior paint lines with a utility knife to avoid damaging drywall or trim. Remove interior stops, cut sash balance cords, and extract old sashes.
- Rough Opening Prep: Clear out legacy debris, old caulk, and protruding fasteners. Verify the sill is structurally sound and dry.
- Sill Pan & Flashing: For full-frame jobs, apply a preformed sloped sill pan and integrate self-adhering flashing tape in a bottom-to-top shingle-lap fashion to channel moisture outward.
- Dry Fit & Shimming: Set the new unit into the opening on composite shims positioned beneath side jambs and at midpoint anchor locations. Confirm the unit is plumb, level, and square.
- Fastening: Drive structural fasteners through pre-drilled side jamb mounting holes into framing studs. Never over-tighten, which can bow the side frame.
- Insulating: Fill the perimeter gap between frame and rough opening with dedicated low-expansion insulating foam. Never use high-expansion foam, which can warp frame vinyl and jam sash operation.
- Sealing & Trim: Apply a continuous bead of elastomeric sealant around exterior perimeters, reinstall interior trim stops, and test sash latch operation.
Hidden Costs, Code Compliance, and Egress Requirements
Our ultimate checklist for house window replacement highlights auxiliary factors that influence final project estimates:
- Egress Compliance (IRC R310): Habitable bedrooms require at least one egress window with a minimum net clear opening of 5.7 square feet (5.0 sq ft for ground floor), a minimum clear opening height of 24 inches, a minimum width of 20 inches, and a sill height no higher than 44 inches from the floor. Full basement egress conversions involving foundation cutting and exterior wells cost $2,500 to $8,000.
- Stucco Cutting and Patching: Removing windows set into exterior stucco involves saw-cutting, new paper/wire lath integration, and multi-coat stucco patching, adding $300 to $900 per opening.
- Lead-Safe Work Practices: Homes constructed prior to 1978 containing lead paint require EPA RRP-certified containment, HEPA filtration, and disposal protocols ($50 to $150 per window).
- Safety Glass Codes: Windows located within 24 inches of a door or less than 60 inches above a bathtub/shower floor require impact-resistant tempered safety glass ($40 to $150 extra per opening).
Frequently Asked Questions About Replacement Windows
Use our guide on how to pick the best window installers to evaluate contractor quotes and protect your investment.
What is the cheapest fix for a foggy window?
A foggy double-pane window indicates perimeter seal failure, allowing moist ambient air into the air space where desiccant materials become saturated.
The cheapest fix is replacing only the sealed Insulated Glass Unit (IGU) rather than tearing out the entire window frame. A professional glazier can swap the IGU for $150 to $700 per unit—roughly 50% to 60% less than a complete window replacement. However, if the framing sash is warped, cracked, or binding, replacing the entire window unit provides a more reliable, permanent solution.
Do new windows really pay for themselves in energy savings?
While energy-efficient windows reduce heat transfer, they rarely pay for themselves on utility bill reductions alone. Upgrading single-pane windows to ENERGY STAR models saves approximately $101 to $583 annually, while replacing older double-pane units saves roughly $27 to $197 annually, translating to an 8- to 15+ year payback period.
The true value lies in home comfort, soundproofing, and strong resale ROI. The national Cost vs. Value report shows that homeowners recoup 65% to 76% of their window replacement costs at resale, making it one of the highest-returning exterior remodeling projects.
How do I choose between local installers and national franchises?
National sales franchises often feature aggressive same-day sales tactics and price their services 30% to 60% higher to absorb massive advertising overhead. Local, factory-certified contractors generally provide transparent line-item quotes, personalized customer care, and lower labor pricing. Always insist on seeing proof of licensing, liability insurance, and written manufacturer-backed workmanship warranties before signing any contract.
Conclusion
At River Valley Window Co., we serve homeowners across Northwestern Arizona, including Lake Havasu City, with fast, non-invasive installations of premium, energy-efficient Milgard window and door products engineered to conquer desert heat.
Milgard products are backed by robust warranty protections. The standard Limited Lifetime Warranty varies between new construction and replacement applications and occupancy types; if transferred after sale, it converts to a 10-year parts-only limited warranty calculated from the manufacture date, with 10-year hardware coverage and product-specific finish/weatherstripping terms. Note these specific shorter Milgard warranty limits:
- 10-year limits: Insulated glass unit delamination, integrated blind defects, and peeling or fading exterior finishes.
- 1-year limits: Weatherstripping, insect screens, and corrosion on stainless steel hardware.
Homeowners can also choose the optional paid Full Lifetime Warranty upgrade. Valid for the natural lifetime of the original consumer owner (non-transferable), this upgrade covers both parts and labor, includes accidental glass breakage coverage on Tuscany® V400 and V450 series, and allows glass breakage protection to be added as an upgrade for the Trinsic™ V300 series.
Ready to upgrade your home’s efficiency and aesthetic appeal? Explore our professional window replacement services today to schedule your consultation.