

Why Your Windows Are Costing You More Than You Think
The best way to replace windows starts with understanding what method fits your home — and then following a proven process to get it right the first time.
Here’s a quick answer if you’re in a hurry:
The Best Way to Replace Windows (Quick Summary)
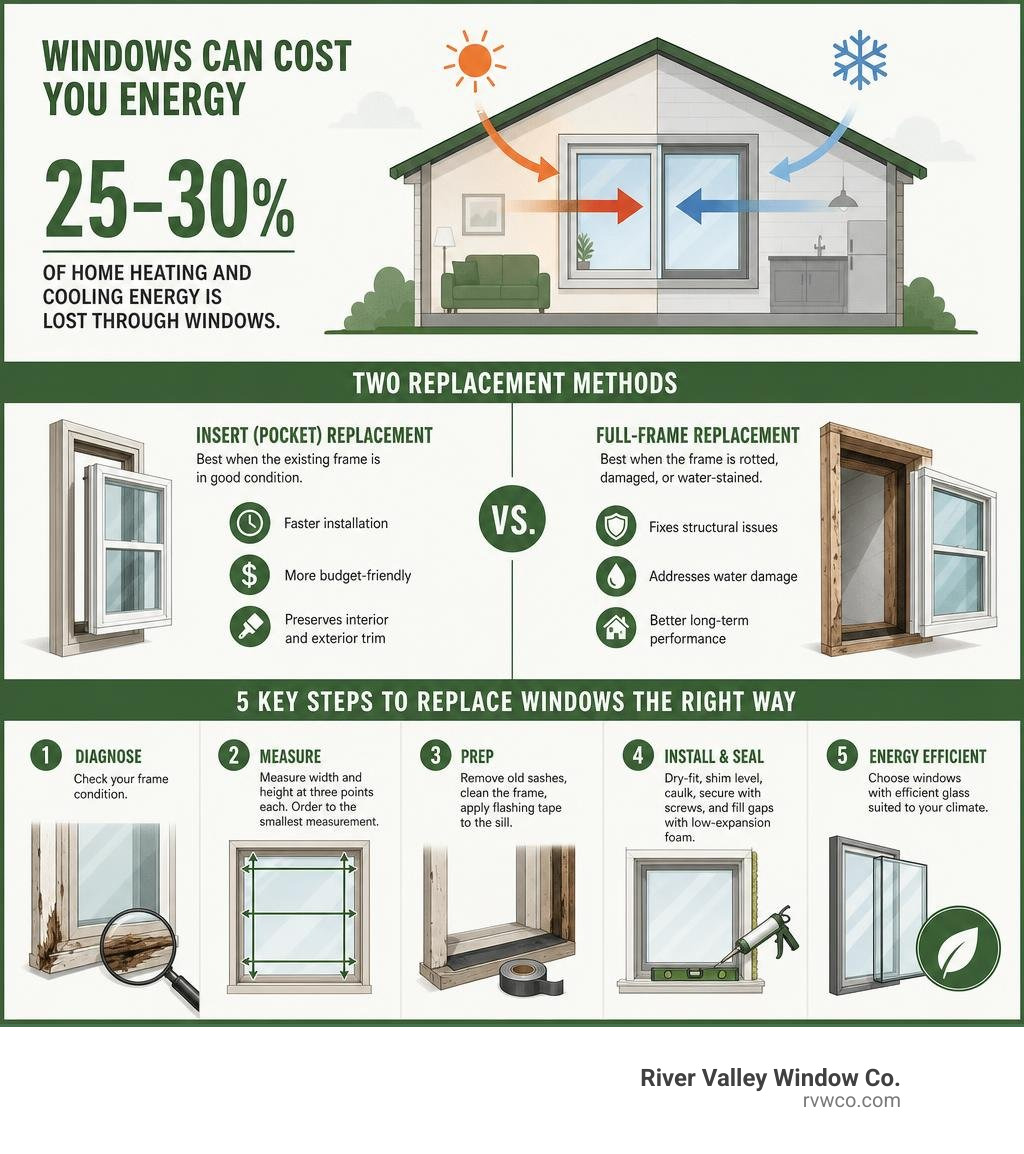
- Diagnose your frame condition — Sound frame? Use pocket (insert) replacement. Rotted or damaged frame? You need full-frame replacement.
- Measure accurately — Measure width and height at three points each. Always order to the smallest measurement.
- Prep the opening — Remove old sashes, clean the frame, and apply flashing tape to the sill.
- Install and seal — Dry-fit first, then shim level, caulk, secure with screws, and fill gaps with low-expansion foam.
- Choose energy-efficient glass — Look for ENERGY STAR certification, a low U-factor, and Low-E coating suited to your climate.
Old, drafty windows are one of the biggest energy drains in any home. Heat gain and heat loss through windows account for 25–30% of residential heating and cooling energy use — a serious number if you’re paying summer cooling bills in Northwestern Arizona.
The good news? Replacing those windows is one of the most impactful upgrades you can make. Homeowners who install ENERGY STAR certified windows see an average 13% reduction in energy bills, with real dollar savings that add up fast.
But getting it wrong — wrong measurements, wrong installation method, poor sealing — can mean water damage, drafts, and voided warranties. This guide walks you through every step so you get it right.
Understanding Your Options: Insert vs. Full-Frame Replacement
When it comes to upgrading, there are two primary installation paths. Choosing between them is the single most important decision you will make. It affects your budget, your timeline, and how much of your home’s original trim is left intact.
Before you commit, it helps to understand What You Need to Know Before Getting New Windows to avoid common planning pitfalls.

- Pocket (Insert) Replacement: This method allows you to slide a new window unit directly into the existing wood frame. The original interior trim, exterior casing, and siding remain completely untouched. It is fast, highly efficient, and minimally invasive.
- Full-Frame Replacement: This is a complete tear-out. We remove the old window, the frame, the exterior trim, and the interior casing down to the rough opening. This is a more complex carpentry project but is necessary if the existing opening is structurally compromised.
To help you visualize the differences, here is a quick comparison of the two methods:
| Feature | Pocket (Insert) Replacement | Full-Frame Replacement |
|---|---|---|
| Average Cost | Lower ($300 – $700 per window) | Higher ($600 – $1,500 per window) |
| DIY Difficulty | Moderate (2–4 hours per window) | High (Requires advanced carpentry) |
| Trim Impact | None (Preserves original trim/siding) | High (Requires replacing interior/exterior trim) |
| Best For | Structurally sound, square frames | Rotted frames, size changes, water damage |
| Glass Area | Slightly reduced (due to frame-in-frame) | Maximized (matches original rough opening) |
When to Choose Pocket (Insert) Installation
An insert replacement is the best way to replace windows if your existing window frames are structurally sound, level, and square. If you are happy with the current size and style of your windows, and the surrounding wood shows no signs of rot or moisture damage, pocket installation is your best friend.
It is also an excellent option if you want to preserve historic interior trim or custom exterior stucco that would be costly to repair. However, if you are unsure whether your frames are healthy enough for this shortcut, check out our guide on How to Know When You Need a Window Replacement to diagnose your frame’s health.
When to Choose Full-Frame Installation
You must go the full-frame route if your existing frames are soft, rotted, or severely out-of-square (more than 1/4 inch). In Northwestern Arizona, where intense desert heat can warp older materials over time, hidden structural damage is common.
A full-frame replacement is also required if you want to change the size or shape of your window, or if you are dealing with active water leaks behind the wall. For a technical deep dive into how building science handles complete frame tear-outs, you can review the Complete Window and Frame Replacement | Building America Solution Center .
Step-by-Step: The Best Way to Replace Windows Yourself
For an experienced DIYer, pocket window replacement is a highly rewarding weekend project. However, we always urge caution. If your home was built before 1978, the existing paint likely contains lead, which requires specialized lead-safe handling procedures to prevent hazardous dust.
Additionally, if you are tackling this yourself, consult trusted resources like the guide on How to Install a Replacement Window – This Old House for expert visual references.
Measuring Your Openings: The Best Way to Replace Windows Accurately
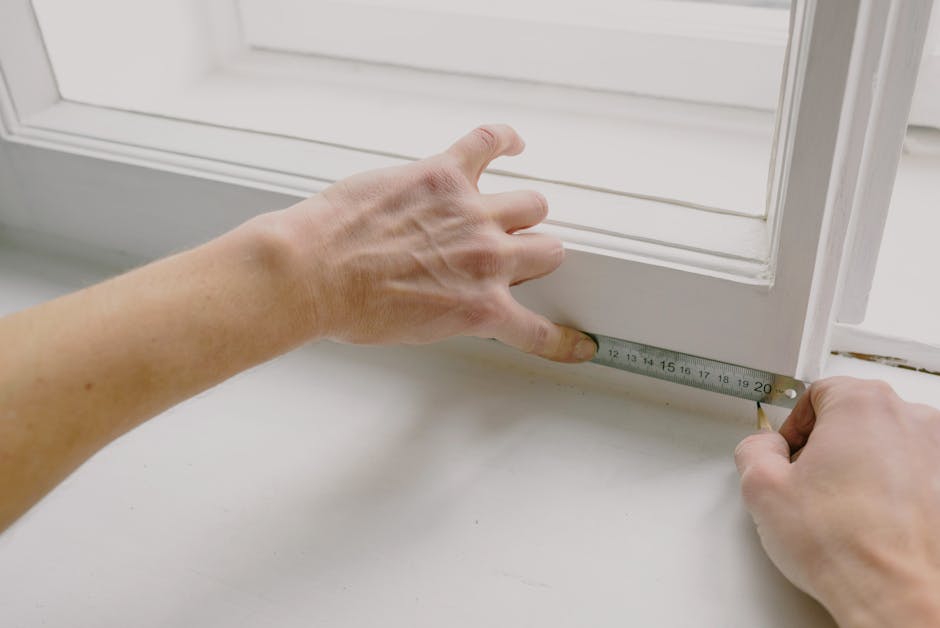
The absolute golden rule of window replacement is: Measure twice, order once, cry zero times. If your measurements are off by even a quarter of an inch, your new window will either not fit or fail to seal properly.
To measure for a pocket replacement:
- Measure the Width: Measure the distance between the inside of the jambs at the bottom, middle, and top of the window opening. Write down all three numbers and use the smallest measurement.
- Measure the Height: Measure from the high point of the sill (the part closest to the inside) to the top jamb. Do this on the left, middle, and right. Use the smallest measurement.
- Check for Squareness: Measure diagonally from corner to corner. If the two diagonal measurements differ by more than 1/4 inch, the frame is out of square. You will either need to adjust with shims or opt for a full-frame replacement.
When ordering your new pocket window, subtract 1/4 inch from your smallest width and height measurements to allow room for adjusting and shimming. For more tips on matching your measurements to the right product, read our guide on How to Choose the Right Replacement Windows for Your Needs.
Tools, Materials, and Preparation
Before you pop out your old windows, make sure you have all your tools laid out. There is nothing worse than standing next to an open hole in your wall in the middle of July in Lake Havasu City while realizing you ran out of caulk.
- Safety gear: Safety glasses, heavy-duty work gloves, and a dust mask.
- Hand tools: Utility knife, pry bar, hammer, screwdriver, level, and tape measure.
- Sealing materials: High-quality flashing tape, low-expansion spray foam (specifically labeled for windows and doors), and premium exterior-grade silicone or butyl caulk.
- Installation hardware: Wood shims, corrosion-resistant screws, and a caulking gun.
Removing the Old Window and Preparing the Opening
- Score the edges: Use your utility knife to score the paint or caulk lines around the interior stop beads. This prevents the drywall or wood trim from chipping when you pry them off.
- Remove the stops: Gently pry away the interior window stops. Keep them intact if you plan to reuse them.
- Remove the sashes: Cut any sash cords or remove the balance hardware holding the old sashes in place. Carefully lift out the bottom sash, then the top sash.
- Clean the frame: Remove any remaining dust, old caulk, loose paint, or stray nails from the existing frame. Inspect the wood with an awl to ensure there is no hidden rot.
- Level the sill: Place your level on the sill. If it is uneven, apply thin wood shims to create a perfectly level platform.
Installing, Flashing, and Sealing the New Window
- Dry-fit the window: Before applying any sealant, lift the new window into the opening. Make sure it fits comfortably with a small gap (about 1/8 to 1/4 inch) all the way around. Remove the unit.
- Apply flashing tape: Apply waterproof flashing tape along the sill, wrapping it slightly up the sides of the jambs to create a watertight pan.
- Apply caulk: Run a thick, continuous bead of silicone caulk along the interior face of the exterior blind stop.
- Set the window: Lift the new window into place, pressing it firmly against the caulked exterior stops.
- Shim and secure: Insert wood shims at the screw hole locations on the sides of the frame. Use your level to ensure the window is perfectly plumb, level, and square. Drive the installation screws through the pre-drilled holes and shims into the rough frame. Do not over-tighten, as this can warp the vinyl or fiberglass frame.
- Insulate: Fill the small gaps around the window frame with low-expansion foam. Warning: Do not use standard high-expansion foam, as it can exert enough pressure to bend the window frame and prevent the sashes from operating.
- Seal the exterior: Apply a clean bead of exterior caulk around the outside perimeter. Ensure you do not block the window’s weep holes, which are designed to let water drain out safely.
Maximizing Energy Efficiency and Value
Upgrading your windows is about more than just aesthetics; it is a major financial investment in your home’s performance. Because windows account for approximately 45% of a home’s heat gain or loss despite taking up only 8% of the exterior surface, choosing the right materials is crucial.
If you are weighing your options, take a look at our breakdown of 3 Materials to Consider for Your Replacement Windows to see how vinyl, fiberglass, and wood compare.
Choosing the Best Way to Replace Windows for Your Climate
For homeowners in Lake Havasu City and across Northwestern Arizona, our primary battle is with the sun. While cold-climate homes focus heavily on trapping heat inside, we need windows designed to reflect intense solar radiation.
When shopping for windows, pay close attention to the National Fenestration Rating Council (NFRC) label:
- Solar Heat Gain Coefficient (SHGC): This measures how much solar radiation passes through the glass. In our hot desert climate, you want an SHGC rating of 0.20 or lower to block the sun’s scorching rays.
- U-Factor: This measures the rate of non-solar heat transfer. A lower U-factor means better insulation, keeping your air-conditioned air inside where it belongs.
- Low-E Coatings: This microscopic metallic layer reflects infrared heat while letting visible light pass through. In the desert, Low-E should be applied to the exterior glass pane to bounce heat away before it ever enters your home.
Your choice of frame material also matters. Vinyl is highly cost-effective and offers excellent thermal insulation. Fiberglass is incredibly strong and expands and contracts at virtually the same rate as glass, making it highly durable in extreme temperature swings.
For a deeper look into selecting the right frame for your home, explore our guide on How to Choose the Right Window Material.
Financial Benefits: Energy Savings, Tax Credits, and Resale Value
Upgrading to energy-efficient windows offers an impressive return on investment.
- Resale Value: According to national estimates, homeowners recoup an average of 67% of a vinyl window replacement job’s cost in the selling price of their home. If you are planning to sell soon, read about the 4 Reasons to Replace Your Windows Before Selling Your Home to maximize your curb appeal.
- Federal Tax Credits: Under current energy incentives, homeowners can claim a 30% federal tax credit (up to $600 annually) for installing ENERGY STAR’s Most Efficient windows.
- Utility Savings: Upgrading 10 old single-pane windows to ENERGY STAR models can save you hundreds of dollars annually on cooling bills.
To map out your project’s financial plan, check out our guide on How to Budget for Window Replacement for Your Home.
Frequently Asked Questions About Window Replacement
How much does window replacement typically cost?
On average, a professional window replacement project for a standard-sized vinyl window ranges from $300 to $700 for pocket installations, while full-frame replacements can range from $600 to $1,500. Labor rates typically average around $465 per window. A full home project of 10 windows generally ranges from $5,600 to $10,300 depending on the frame material and glass packages.
For a detailed cost breakdown tailored to your budget, see our guide on How to Budget for Window Replacement for Your Home.
When should I hire a professional instead of attempting a DIY installation?
While DIY pocket installation is highly feasible for handy homeowners, you should always hire a professional if:
- Your existing window frames are rotted, water-damaged, or out-of-square.
- You are replacing windows on a second story (safety first!).
- You want to change the size or style of your windows, which requires structural framing.
- You want to preserve your manufacturer’s warranty, as many high-end brands require professional installation to keep the warranty valid.
If you decide to go the professional route, make sure you ask the right questions. We have compiled the top 3 Questions to Ask a Window Replacement Company to help you vet potential contractors.
How do I maintain my new windows to ensure they last?
Modern vinyl and fiberglass windows are remarkably low-maintenance, but a little care goes a long way:
- Clean the tracks: Vacuum out dirt, sand, and desert dust twice a year to keep the sashes sliding smoothly.
- Clear the weep holes: Periodically check the small drainage holes at the bottom of the exterior frame to ensure they are not clogged with debris.
- Inspect the caulk: Check the exterior caulking annually and touch up any areas that show signs of cracking or peeling.
- Lubricate hardware: Apply a dry silicone spray to locks, hinges, and rollers once a year. Avoid heavy oils or WD-40, which can attract dust and clog the mechanisms.
Conclusion
Finding the best way to replace windows does not have to be a stressful process. Whether you choose to tackle a pocket replacement yourself or opt for a full-frame upgrade, prioritizing high-quality materials and precise seals will keep your home comfortable and energy-efficient for decades to come.
At River Valley Window Co., we specialize in making window replacement completely painless for homeowners in Lake Havasu City and Northwestern Arizona. As desert homeowners ourselves, we understand the unique thermal challenges of our climate. That is why we specialize in high-performance Milgard energy-efficient products, designed to block the desert heat and keep your cooling bills low.
We pride ourselves on fast, non-invasive installations that protect your home’s original trim and stucco, all backed by our industry-leading lifetime warranty.
Ready to upgrade your comfort and slash your energy bills? Get professional window replacement services from River Valley Window Co. today, and let us help you find the perfect view!