

Planning a Bay Window Installation
Start with the opening, not the window. For a bay window installation, measure the wall space and inspect the existing frame for rot or water damage. Then confirm how the projecting window will be supported, choose a unit that fits the opening, and plan for flashing, insulation, and exterior finishing. Have a qualified installer assess any framing changes before work begins.
Replacing a drafty bay window can keep its classic shape while adding modern, energy-efficient glass. The window unit alone may cost roughly $800 to $3,000, depending on size and material. Structural repairs, a new roof over the window, and labor can raise the total. This guide explains what drives those costs and what the installation involves.
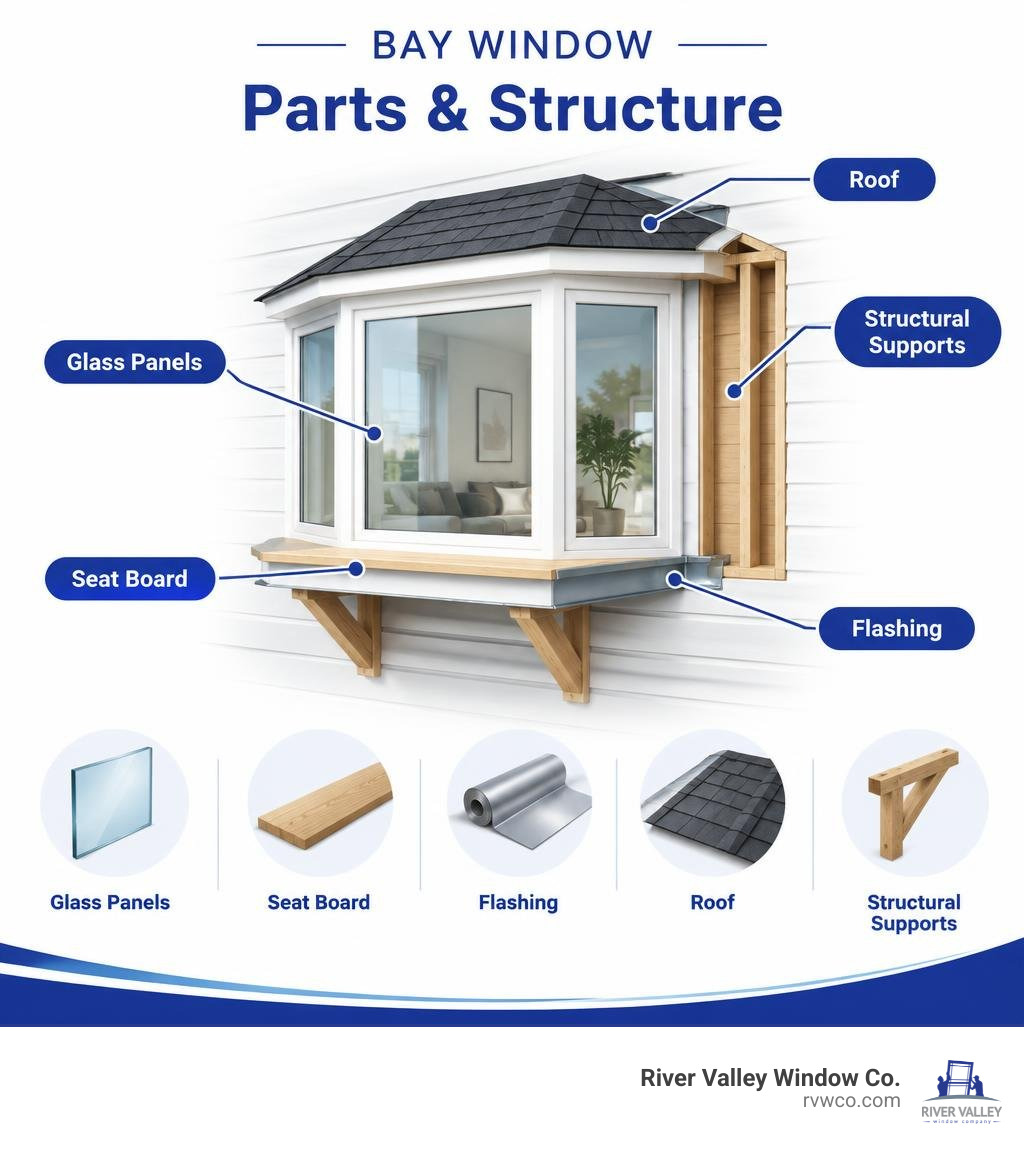
Bay window installation vocabulary:
Bay vs. Bow Windows: Structural Differences and Framing Demands
While both bay and bow designs project outward from an exterior wall, their structural mechanics, sightlines, and framing requirements differ significantly. Understanding these engineering differences is essential when deciding which style best complements your architecture and interior design goals.
A traditional bay window features a three-panel configuration consisting of a large, stationary picture window in the center flanked by two angled side windows (often double-hung or casement units). These side panels are set at crisp 30-degree or 45-degree angles, creating a deep, distinct polygon alcove. This sharp projection creates usable interior floor space, making it the ideal setting for a built-in seat board, breakfast nook, or reading bench.
In contrast, a bow window relies on a multi-panel arrangement—typically four, five, or six identical lites—set at shallower angles (usually 10 to 15 degrees per joint) to form a gentle, curved architectural arc. Bow windows project less deeply into the exterior space, but they wrap around wider wall spans to provide panoramic sightlines and expansive daylighting. Deciding how window placement can change the mood of a room often comes down to choosing between the defined geometric alcove of a bay and the sweeping curve of a bow.
| Feature | Standard Bay Window | Traditional Bow Window |
|---|---|---|
| Panel Configuration | 3 panels (fixed center + 2 angled flanks) | 4 to 6 equally sized panels |
| Projection Angles | 30° or 45° sharp angles | 10° to 15° shallow facets forming a smooth arc |
| Projection Depth | Deep (typically extends 18″ to 24″ outward) | Shallow (typically extends 8″ to 14″ outward) |
| Interior Space | Deep alcove ideal for bench seating | Gentle interior shelf; maximizes panoramic view |
| Framing Complexity | Requires precise angular headers and roof cab | Requires curved soffit framing and multi-point tie-ins |
| Support Demands | Cable support or exterior knee braces | Heavy-duty structural cable system or foundation brackets |
| Average Unit Cost | $800 – $3,000+ | $1,500 – $4,500+ |
Because bay windows extend farther past the exterior building envelope, they transfer substantial cantilevered loads back into the structural wall framing. This structural dynamic makes your choice of frame materials and support systems crucial to long-term performance.
Choosing the Right Frame Materials for Longevity
The durability, thermal efficiency, and structural rigidity of your projecting window depend heavily on its framing material. Selecting the right frame ensures that your investment resists seasonal weather shifts without warping or losing structural integrity.
- Premium Vinyl: High-grade vinyl profiles offer outstanding thermal insulation and minimal maintenance. Because vinyl does not conduct heat readily, exploring how vinyl windows enhance energy efficiency in your home is a great way to lower utility expenses. Multi-chambered vinyl extrusions trap dead air to minimize thermal transfer, and modern vinyl formulas resist UV degradation and chalking.
- Architectural Aluminum: Thermally broken aluminum windows provide structural rigidity and slim profiles that maximize the daylighting glass area. In warm desert climates like Lake Havasu City, quality aluminum frames withstand high ambient temperatures without twisting or bowing under heavy glass loads.
- Composite & Fiberglass: Combining the low maintenance of vinyl with the structural strength of solid timber, composite and fiberglass window frames offer exceptionally low rates of thermal expansion. They move at nearly the same rate as the insulated glass units they hold, minimizing seal failure over decades of sun exposure.
Reviewing how to choose the right window material allows you to balance curb appeal, energy codes, and structural performance for your specific climate.
Step-by-Step Bay Window Installation and Preparation
Proper rough opening preparation ensures a weatherproof, level, and square assembly. If the initial opening is out of alignment, the window sashes will bind, hardware will wear prematurely, and seals may fail.

Before lifting the new window into place, ensure that the framing matches these engineering tolerances:
- Verify Squareness: Measure the rough opening diagonally from corner to corner in an ‘X’ pattern. The maximum allowable deviation from square is 1/8 inch for windows 20 square feet and smaller, and 1/4 inch for windows larger than 20 square feet.
- Verify Level and Plumb: Use a precision 4-foot or 6-foot level to check the sill plate and side jack studs. The maximum allowable deviation for level and plumb is 1/16 inch for every 2 feet of rough opening span (not to exceed 1/8 inch total).
- Install a Solid Base: Fasten a continuous, level 1×4 or 2×4 sill support board across the base of the rough opening.
- Shim the Base: Place non-water-degradable composite shims beneath the structural contact points, leaving a 1/4-inch expansion clearance between the shims and the interior jamb edges.
- Review Framing Standards: If you are transitioning from standard flat windows, consulting a guide on comparing new construction windows will help clarify how nail fin setbacks and structural studs integrate with exterior sheathing.
Essential Flashing and Waterproofing Techniques for Bay Window Installation
Projecting window assemblies face wind-driven rain, sun exposure, and negative indoor air pressures that can pull moisture into tiny exterior gaps. A complete weather-resistive barrier (WRB) integration strategy is essential to prevent internal wall rot:
- Install a Sloped Sill Pan: Apply a pre-formed or site-fabricated flexible flashing membrane across the bottom sill plate before window placement. Turn the flashing up at least 2 inches on the interior side and up the jack studs to form a waterproof sill pan that drains outward.
- Integrate Self-Adhesive Flashing Tape: Once the window is anchored through its integrated nailing fin, apply heavy-duty butyl or asphalt-based flashing tape over the side fins, overlapping the sill flashing. Apply head flashing tape last, overlapping the vertical side strips in a shingle fashion to shed water downward.
- Install Head Drip Edge Flashing: Mount a corrosion-resistant metal drip cap above the rough opening and over the upper flange, extending at least 1/2 inch beyond both sides of the frame.
- Create Continuous Air Seals: From the interior, apply a continuous bead of low-expansion, closed-cell polyurethane spray foam between the window jamb and the rough framing. Avoid overpacking, which can bow the jambs and interfere with window operation.
Critical Structural Anchoring and Support Methods
Because a bay window unit extends beyond the exterior building envelope, gravity works continuously to pull the top of the frame outward and push the base downward. Without dedicated structural bracing, the frame will sag, causing sash distortion, cracked glass, and air leaks.
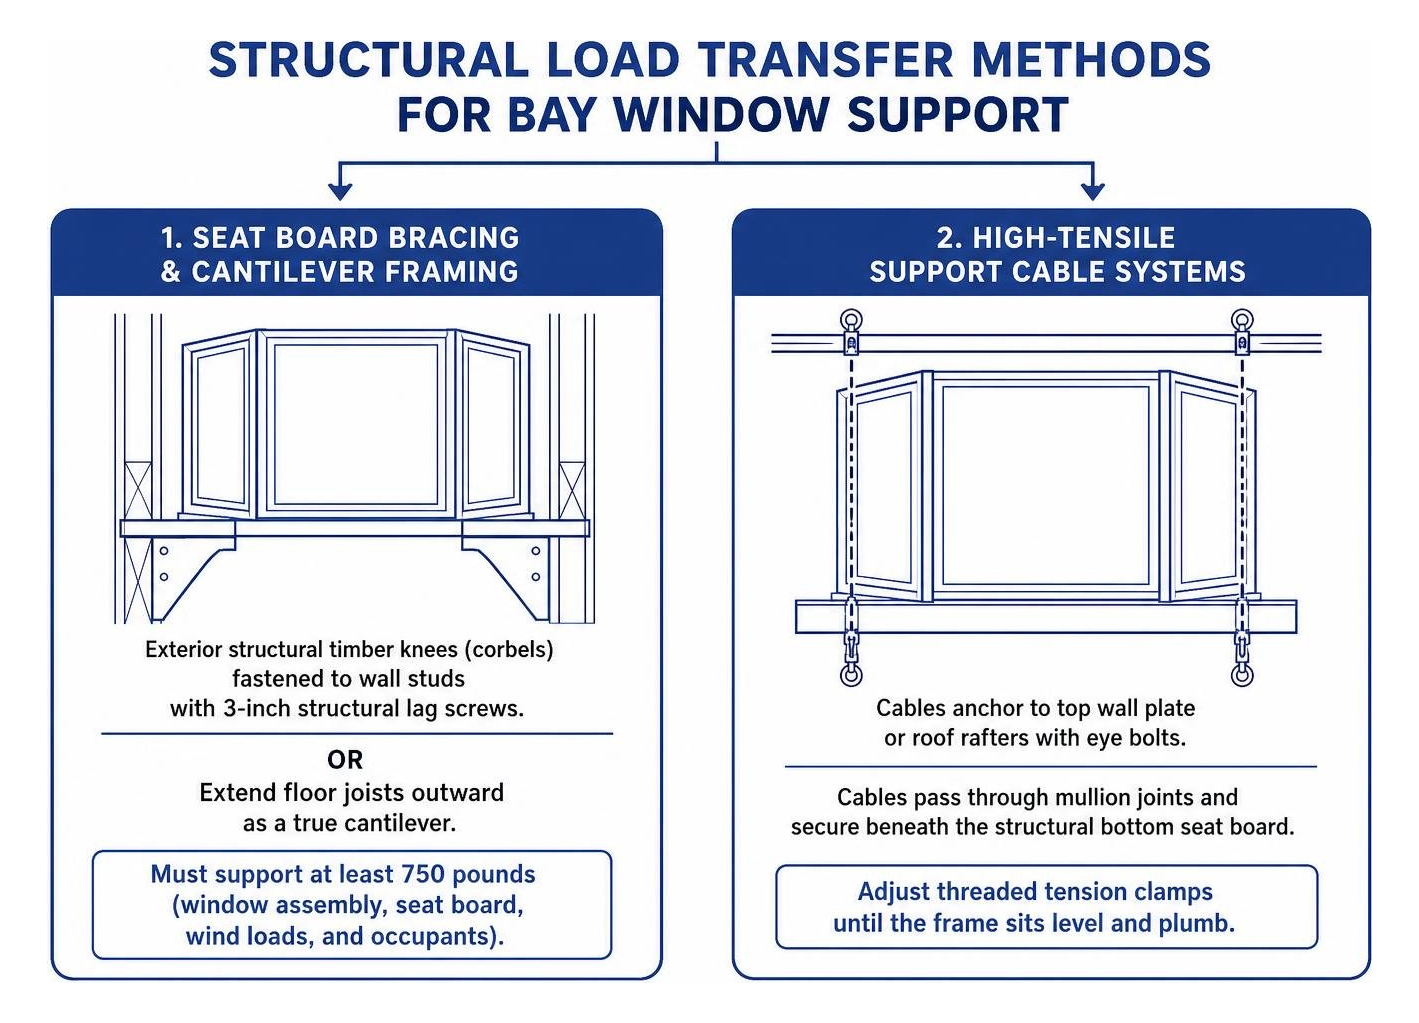
Installers utilize two primary engineering methods to bear these loads:
- Seat Board Bracing & Cantilever Framing: If the window does not use overhead cables, you must construct structural seat board bracing capable of supporting at least 750 pounds of combined weight (the window assembly, seat board, dynamic wind loads, and occupants sitting on the bench). This is achieved by framing exterior structural timber knees (corbels) into the wall studs with 3-inch structural lag screws, or by extending existing floor joists outward as a true cantilever.
- High-Tensile Support Cable Systems: Many modern units feature overhead steel cable support kits. These high-tensile cables anchor directly into the top wall plate or roof rafters using heavy-duty eye bolts, pass through the mullion joints of the window frame, and secure beneath the structural bottom seat board. Installers adjust the threaded tension clamps until the frame sits level and plumb.
For optimal cross-ventilation, many homeowners choose to open up to the best casement windows on the market for their flanking angled panels, taking advantage of side breezes directed inside by the window’s outward angle.
Framing the Roof Cab, Insulation, and Exterior Finishing
Unless your bay window fits flush beneath an existing soffit or roof overhang, you will need to construct a custom weatherproof roof assembly (often called a roof cab) to protect the projecting head board.
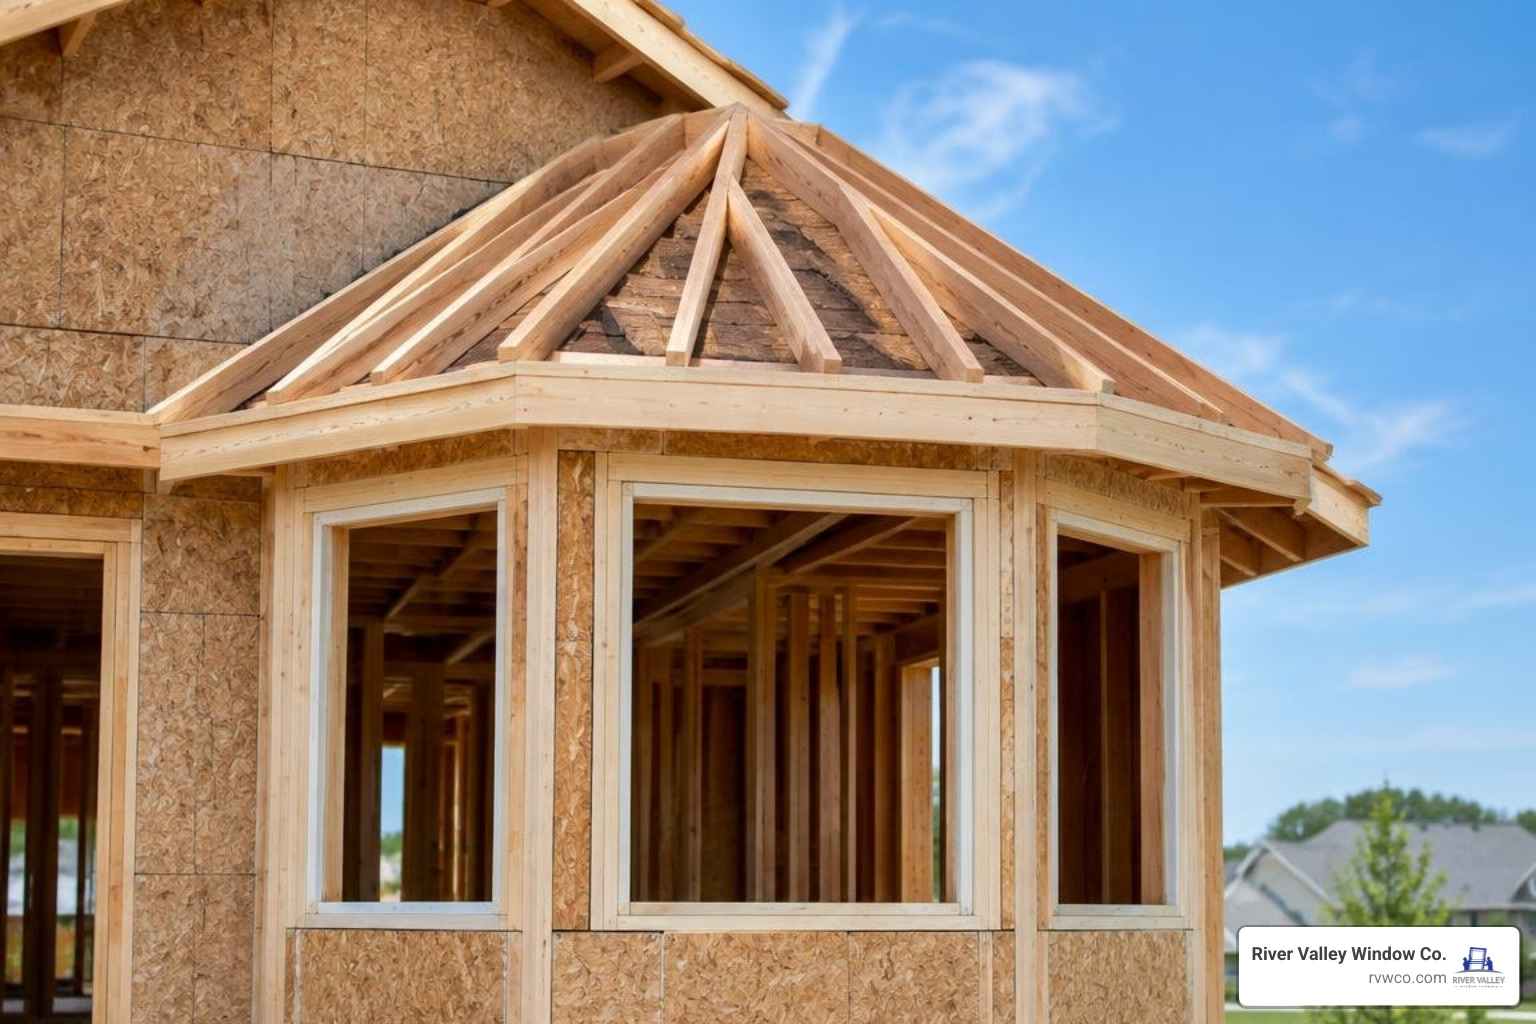
A well-built roof cab relies on sturdy framing, thermal insulation, and reliable water drainage:
- Framing the 45-Degree Hip Roof: Anchor a 2×4 ledger board directly into the exterior wall studs above the window head. Frame two common rafters, two hip rafters cut to match the 30- or 45-degree angle of the window flankers, and corner jack rafters using exterior-grade 2×4 framing lumber.
- Sheathing: Fasten 1/2-inch exterior CDX plywood or OSB sheathing across the rafters, securing panels with 1-1/4-inch exterior screws spaced every 8 inches along framing members.
- Thermal Insulation & Vapor Barriers: Insulate the triangular void between the top of the window head board and the underside of the roof sheathing. Fill this space with high-density rigid foam board (R-15 to R-21) and seal all perimeter edges with expanding foam. Because heat rises and window tops are susceptible to cold sinking, proper insulation is key to learning how energy efficient windows can save you substantial money on heating and cooling bills.
- Roofing & Flashing: Cover the sheathing with self-adhering ice-and-water shield membrane, extending it at least 6 inches up the exterior wall sheathing behind the housewrap. Install metal step flashing and counter-flashing along the wall junction, followed by architectural shingles or standing-seam metal roofing to match your home’s exterior.
- Underside Soffit Finishing: Seal and insulate the underside of the seat board using rigid foam insulation and exterior-grade plywood or fiber-cement soffit boards, finishing with exterior paint or trim wrap to prevent thermal bridging beneath the seat.
Project Costs, Timelines, and Labor Considerations
A bay window replacement is a structural renovation that requires careful planning, skilled labor, and realistic budgeting.
- Window Unit Cost: High-performance vinyl, aluminum, or composite bay window units typically range from $800 to $3,000+, depending on custom sizing, glass package upgrades, and built-in features.
- Framing & Structural Additions: If your project requires building an exterior cantilever or framing a complex structural tie-in, expect framing materials and specialty hardware to add roughly $400 to $1,800.
- Timeline Expectations: Replacing an existing bay window of identical size usually takes a professional crew 6 to 10 hours (approximately one full working day). If the project involves cutting a new rough opening, moving electrical lines, or constructing a custom roof cab from scratch, total installation time may span 8 to 24 labor hours spread over two to three days.
Homeowners planning their budget can reference a cheat sheet to estimate total replacement cost for windows in house to ensure their estimates account for labor, structural prep, and interior trim carpentry.
DIY vs. Professional Bay Window Installation: When to Hire an Expert
While confident DIYers with intermediate woodworking and framing skills can tackle simpler window projects, bay windows introduce structural challenges that make professional installation the safer choice for most homeowners.
A standard bay window assembly weighs between 50 and 150 pounds (23 to 68 kg), and oversized or triple-pane units can exceed 200 pounds. Safely hoisting, leveling, and securing a heavy, projecting unit requires at least two to three experienced workers, temporary exterior shoring scaffolds, and specialized power tools.
Working with professional installers provides several advantages:
- Structural Safety: Ensures that load calculations, stud tie-ins, and support cable tensioning are executed accurately without risking wall deflection.
- Code Compliance: Guarantees that framing, safety glazing near floor levels, and weather barriers meet local building codes.
- Warranty Protection: Protects your product warranty, as manufacturer coverage often requires certified installation methods.
For detailed advice on vetting qualified local contractors, read our guide on how to pick the best window installers.
Frequently Asked Questions About Bay Windows
How long does a bay window replacement take from start to finish?
A standard replacement—removing an old projecting window and installing a new unit into the existing opening—typically takes a trained three-person crew between 6 and 10 hours to complete in a single day. If the project requires structural reframing, extensive dry rot repairs, electrical relocation, or building a custom roof cab from scratch, the work generally requires 8 to 24 labor hours spread across one to three days.
Do all bay windows require support cables or external brackets?
Yes, every projecting bay window requires a dedicated load-bearing support system because the unit extends outward past the exterior foundation wall. If the window structure is not supported by floor joist cantilevers, it must use either an overhead high-tensile steel cable system anchored into the wall top plate or exterior structural support brackets (corbels) beneath the seat board rated for at least 750 pounds of total load capacity.
How do you insulate beneath the bay window seat to prevent cold drafts?
To prevent cold drafts and thermal bridging, installers apply high-density rigid foam board (such as polyisocyanurate or extruded polystyrene) directly to the underside of the structural seat board. All perimeter gaps, joist seams, and corner joints are sealed with low-expansion closed-cell spray foam before being enclosed with an exterior-grade plywood or fiber-cement soffit. Pairing this insulated sub-base with double-pane Low-E insulated glass units keeps the interior bench comfortable throughout the year.
Conclusion
Upgrading an aging or drafty opening with a modern bay window brings natural light, expanded living space, and elevated curb appeal to your home. When built with high-performance framing materials and modern Low-E insulated glass, a bay window creates a welcoming focal point while helping maintain indoor comfort through every season.
At River Valley Window Co., we specialize in fast, non-invasive installations throughout Northwestern Arizona and Lake Havasu City, pairing precision craftsmanship with industry-leading products. When selecting Milgard products for your home, understanding your warranty options helps protect your investment over the long term:
- Milgard Full Lifetime Warranty Upgrade: Available as a paid upgrade for the natural lifetime of the original consumer homeowner (non-transferable), this tier covers both parts and labor. It includes glass breakage coverage for Tuscany® V400 and V450 series, and offers glass breakage as an available add-on for the Trinsic™ V300 series. Specific shorter limits apply under this warranty: a 10-year limit applies to insulated glass unit delamination, internal blind defects, and exterior finish peeling or fading; a 1-year limit applies to weatherstripping, window screens, and surface corrosion on stainless steel hardware.
- Milgard Standard Limited Lifetime Warranty: Coverage terms vary based on whether the installation is new construction or replacement, as well as property occupancy. If transferred after the sale of the home, it automatically converts to a 10-year parts-only limited warranty calculated from the original manufacture date, including 10-year hardware coverage alongside product-specific finish and weatherstripping limitations.
Whether you want to revive a classic architectural feature or expand your view with a modern glass projection, our certified team is here to help you design, frame, and complete your project with confidence. Contact River Valley Window Co. today to schedule your consultation and explore our full range of expert window installation and replacement services.