

Start With a Level, Weather-Tight Opening
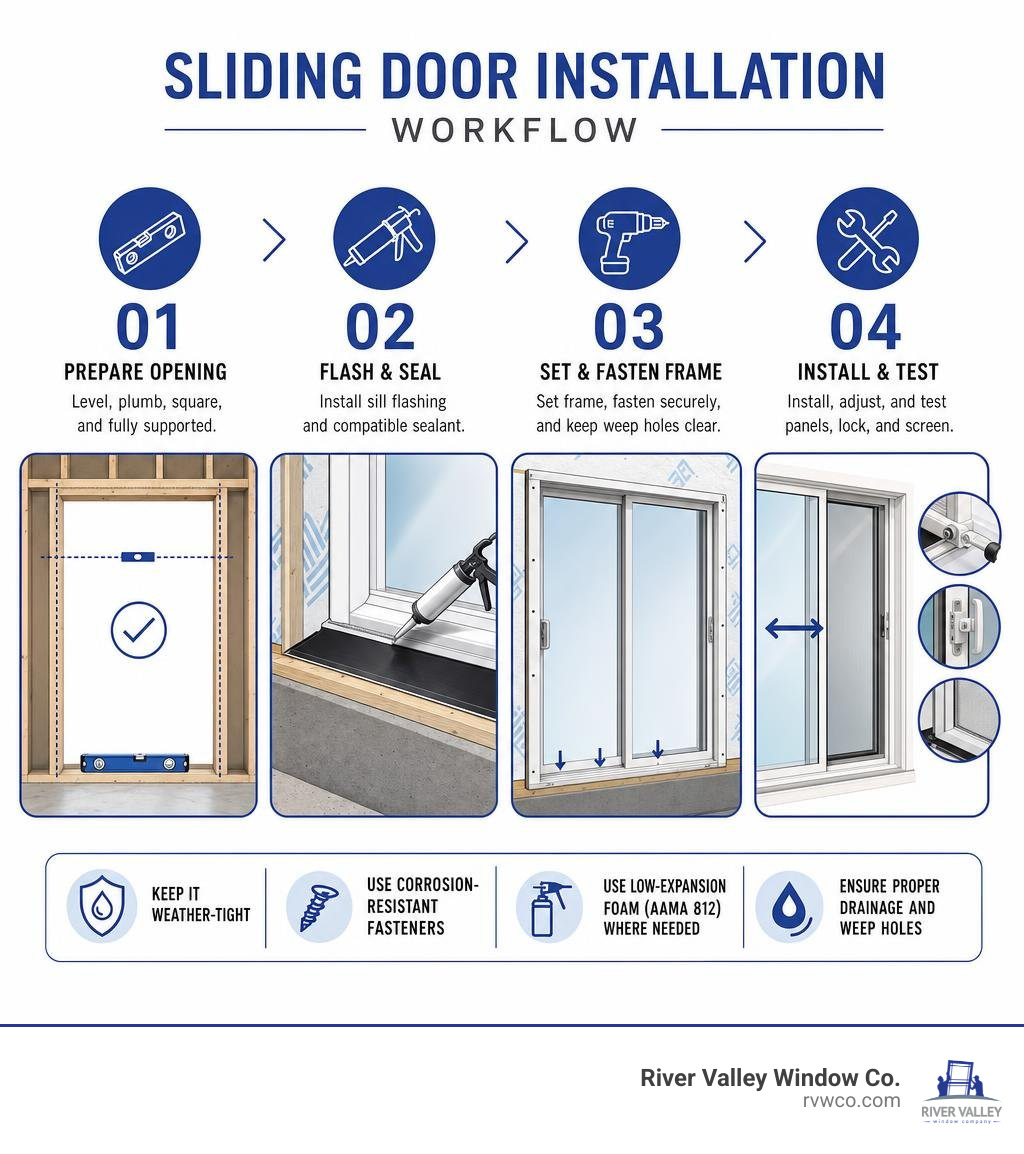
Follow Milgard sliding door installation instructions in this order: verify the rough opening is level, plumb, square, and fully supported; install sill flashing and compatible sealant; set and fasten the frame without blocking weep holes; then install, adjust, and test the panels, lock, and screen.
A sliding patio door can look fine on day one but drag, leak, or fail to lock if the sill is uneven or the frame is racked. For a weather-tight result, leave the required clearance around the frame, use corrosion-resistant fasteners, apply compatible flashing, and use low-expansion foam that meets AAMA 812 where insulation is needed.
This guide explains the key steps for standard Milgard vinyl sliding doors and larger moving glass wall systems, including multi-panel OXO, OXXO, stacking, and pocket configurations. It also covers the adjustments that make the difference between a door that merely closes and one that glides, locks, drains, and seals correctly.
Explore more about milgard sliding door installation instructions:
- Milgard Sliding Patio Doors: Aluminum, Double Panels, and Blinds Explained
- Step-by-Step Guide to Milgard Patio Doors
- A Comprehensive Guide to Milgard Patio Door Replacement Parts
Essential Tools, Materials, and Rough Opening Preparation
A precision installation begins well before unboxing the frame. Proper prep prevents air infiltration, binding panels, and water leaks. Before lifting heavy glass, review our step-by-step guide to Milgard patio doors to confirm your layout requirements.
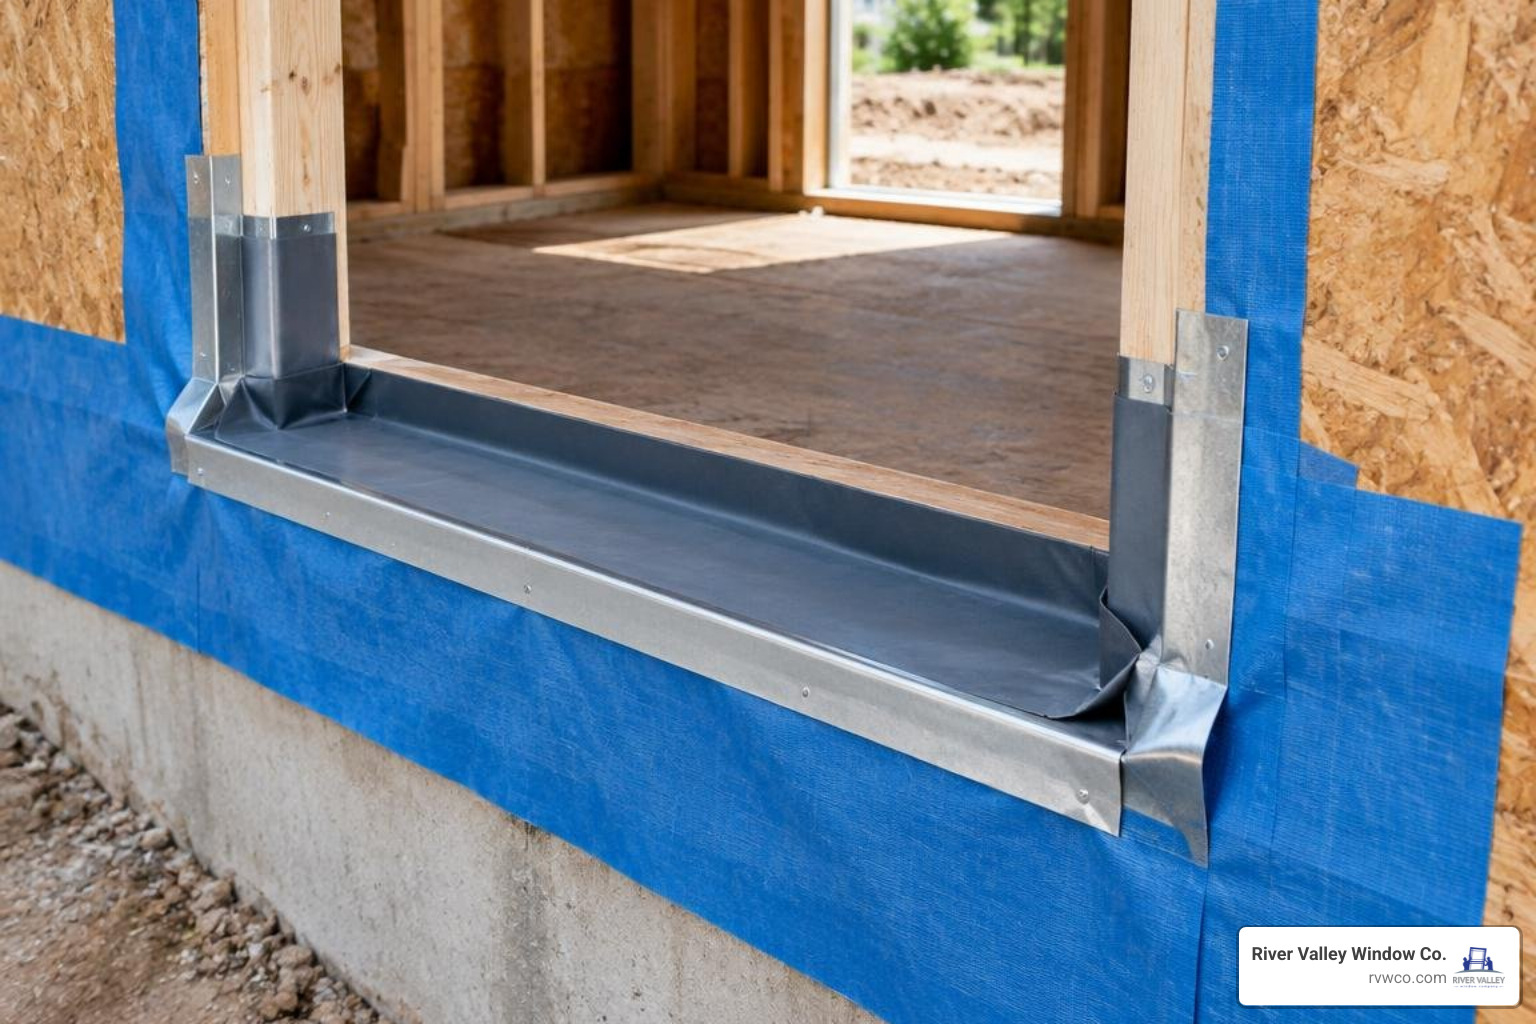
The rough opening must provide a consistent 1/4-inch framing clearance on all sides (head and both side jambs). The sill substrate requires complete, continuous support across the entire width of the frame. Floor flatness tolerances are rigid: deviations must not exceed 1/16 inch per linear foot (.0625″) or a maximum of 1/4 inch (.25″) over the entire span.
Required Tools, Fasteners, and Safety Equipment
Gathering the correct trade tools protects both the installer and the fenestration hardware:
- Personal Protective Equipment (PPE): Safety glasses, heavy-duty cut-resistant gloves, and ear protection.
- Hand Tools: Manual #2 Phillips screwdriver, manual #3 Phillips screwdriver (essential for rollers), 4-inch wide putty knife, dead-blow rubber mallet, pry bar, tape measure, 48-inch spirit level, and a plumb bob or laser level.
- Power Tools: Impact driver with standard driving bits, power drill with a 6-inch long 9/64″ drill bit, and a masonry hammer drill with 1/4″ bits (for concrete subfloors).
- Fasteners & Shims: Corrosion-resistant perimeter screws (#8 and #10 pancake-head or pan-head screws sized for wood or masonry), plastic horseshoe and block shims (wood shims rot and compress).
- Sealants & Insulation: High-performance neutral-cure silicone sealant (such as Dow Corning 795), self-adhering waterproof flashing membrane, and AAMA 812-compliant low-expansion polyurethane foam.
Safety Note: Sliding door glass panels are heavy. Never attempt to lift panels by the top frame rail alone; always use multi-person teams or heavy-duty vacuum suction cups.
Preparing the Rough Opening Under Milgard Sliding Door Installation Instructions
Whether you are performing a new build under AAMA 2400-20 or retrofitting an existing frame per AAMA 2410-13, opening preparation dictates success:
- Subfloor Inspection: Sweep the subfloor clean of all drywall mud, nails, and debris. Check for level across the threshold. If setting on concrete, pre-drill holes and insert green plastic anchor plugs where fasteners will land. For wood subfloors, verify structural integrity and replace rotted framing.
- Lead Paint Protocol: If working on a home built before 1978 in Lake Havasu City or Northwestern Arizona, follow EPA Lead-Safe Certified renovation practices to contain dust.
- Flashing Membrane: Install a waterproof sill pan flashing membrane. Turn the flashing at least 6 inches up each jamb stud, creating a waterproof basin beneath the door sill.
- Weep Clearance: Never apply exterior caulking or flashing in a way that obstructs the drainage weep holes designed into the exterior face of the bottom track.
Step-by-Step Milgard Sliding Door Installation Instructions
Installing a patio door involves careful coordination between structural anchoring and fluid mechanical operation. For deeper insight into frame materials and thermal ratings, consult the homeowners guide to Milgard fiberglass and vinyl patio doors.
Assembling and Flashing the Door Frame
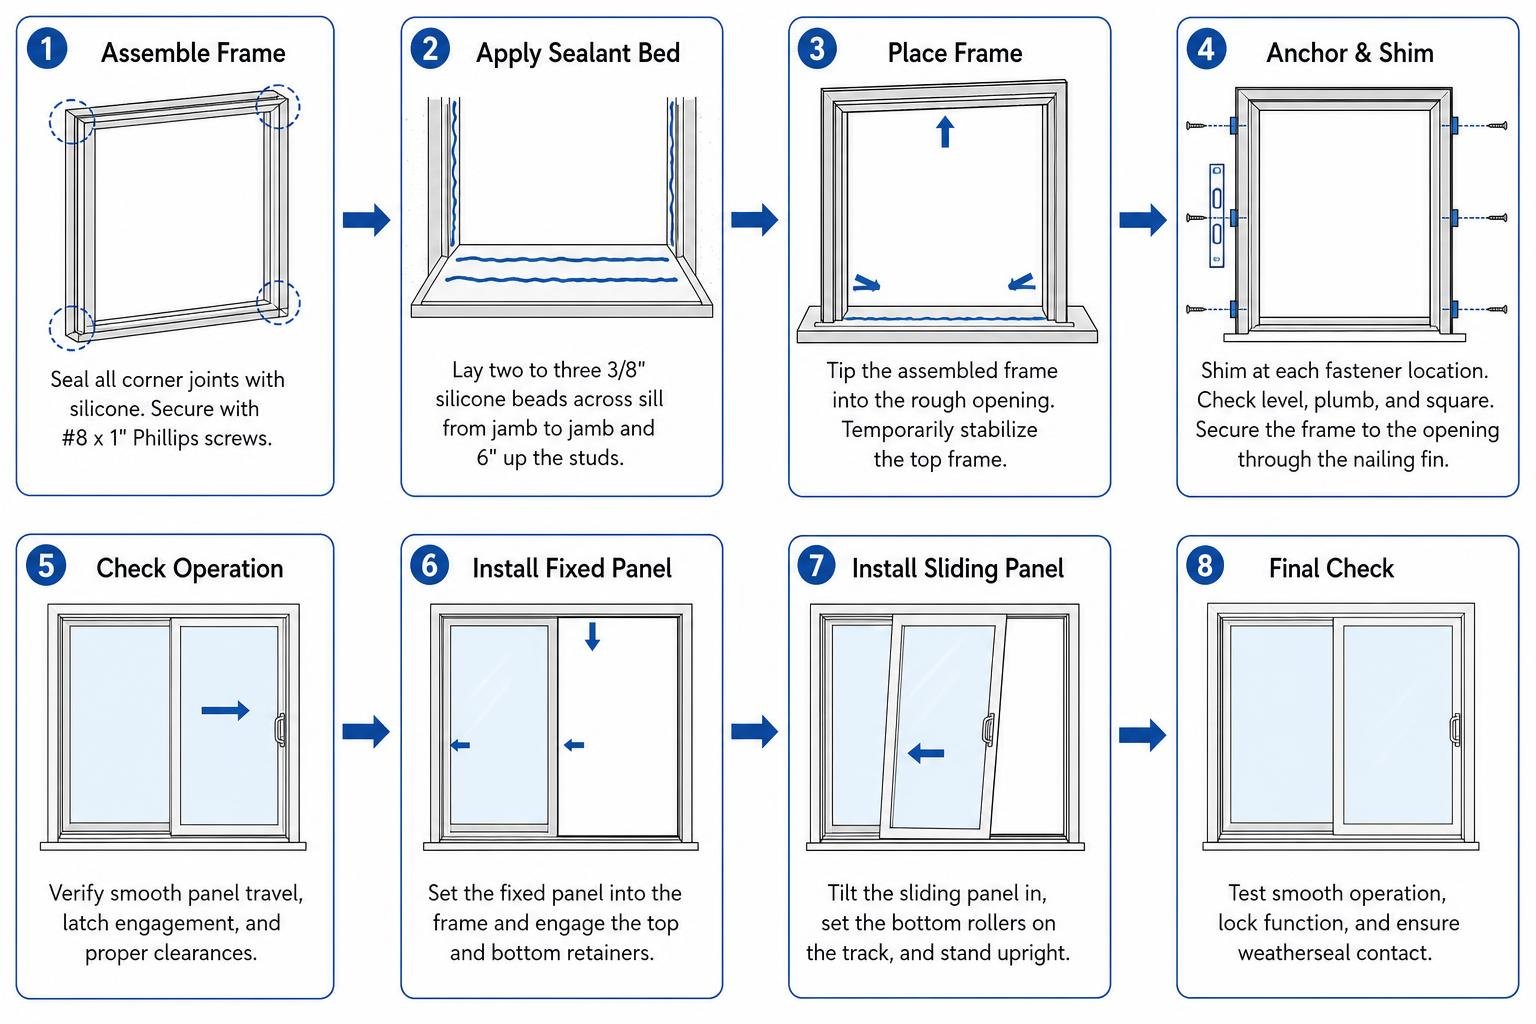
- Frame Sealing & Assembly: For knocked-down (KD) frames, apply a generous 5/16-inch nominal bead of silicone sealant directly to every corner joint before joining the head, sill, and jamb extrusions. Secure corners using the supplied #8 x 1″ Phillips pan-head (PPH) screws.
- Sealant Bed: Lay down two to three continuous 3/8-inch parallel beads of construction silicone across the subfloor sill flashing. Run the sealant bead continuously from jamb to jamb and 6 inches up the vertical studs.
- Frame Placement: Tip the assembled frame into the rough opening. Temporarily stabilize the top frame with an 8d casing nail or clamp.
- Plumb, Level, and Square: Insert plastic horseshoe shims behind fastener locations at the jambs (spaced 12 to 16 inches on center, ensuring a minimum of 6 fasteners per side). Check diagonals; diagonal measurements must match within 1/16 inch.
- Perimeter Fastening: Drive corrosion-resistant #10 screws through the pre-punched nail fin or jamb locator holes. Never place fasteners within 3 inches of frame corners (per AAMA 2400 Method B) to avoid stress cracks on corner welds.
Setting Fixed Panels and Installing Operable Sashes
- Fixed Panel Preparation: Run a continuous 5/16″ bead of silicone at the head and sill where the stationary panel docks. Slide the fixed panel firmly into the stationary pocket.
- Securing Fixed Interlocks: Install the snap-on interlock (VX5228XX), anchor the fixed panel brackets, and attach the top anti-lift clip (VA5215XX) to prevent unwanted panel removal from the exterior.
- Operable Vent Panel Insertion: Store the active slider panel upside down on padded sawhorses until ready to hang (this protects the roller assemblies). Lift the panel into the top head track, swing the bottom inward, and carefully lower it onto the raised stainless steel sill track.
- Protective Components: Snap on the vinyl head and sill covers (VX5016XX), attach the vent panel cover (VX5017XX), and fasten the rubber panel bumper (VA5042BP) to the jamb to cushion panel opening.
Multi-Panel and Moving Glass Wall Milgard Sliding Door Installation Instructions
Multi-slide systems (such as 3-panel OXO, 4-panel OXXO, stacking, and pocketing moving glass walls) introduce multi-track profiles that demand tighter installation tolerances:
| Specification Feature | Standard Vinyl Patio Doors | Aluminum Moving Glass Walls (AX450 / VX350) |
|---|---|---|
| Track Configuration | Single or dual integrated track | Multi-track (up to 4+ stacked tracks) |
| Sill Floor Flatness | Max 1/4″ total variance | Strict 1/16″ per foot; zero crowning allowed |
| Frame Packaging | Fully welded or simple KD | Multi-section heads/sills if over 336″ (28 ft) |
| Panel Interlocking | Snap-on vinyl weather-interlocks | Heavy-duty structural aluminum interlock stiles |
| Water Management | Internal sill weep baffles | Heavy-duty pan flashing with exterior drain covers |
For wide spans exceeding 336 inches (28 feet), Milgard supplies the head track and threshold assemblies in spliced two-piece sections. Align these splices with structural splice plates, ensuring the internal joint is bedded in silicone. When setting pocket doors, plumb the pocket post-interlock member precisely to match the pocket receiver depth inside the 2×6 framing. Review Milgard sliding patio doors aluminum double panels and blinds explained for specialized panel features.
Fine-Tuning Rollers, Hardware, and Patio Screen Adjustments
Once panels are hung, precision fine-tuning ensures smooth operation and reliable security.
For individual components and replacement hardware, reference our comprehensive guide to Milgard patio door replacement parts.
Roller Height and Daylight Reveal Calibration
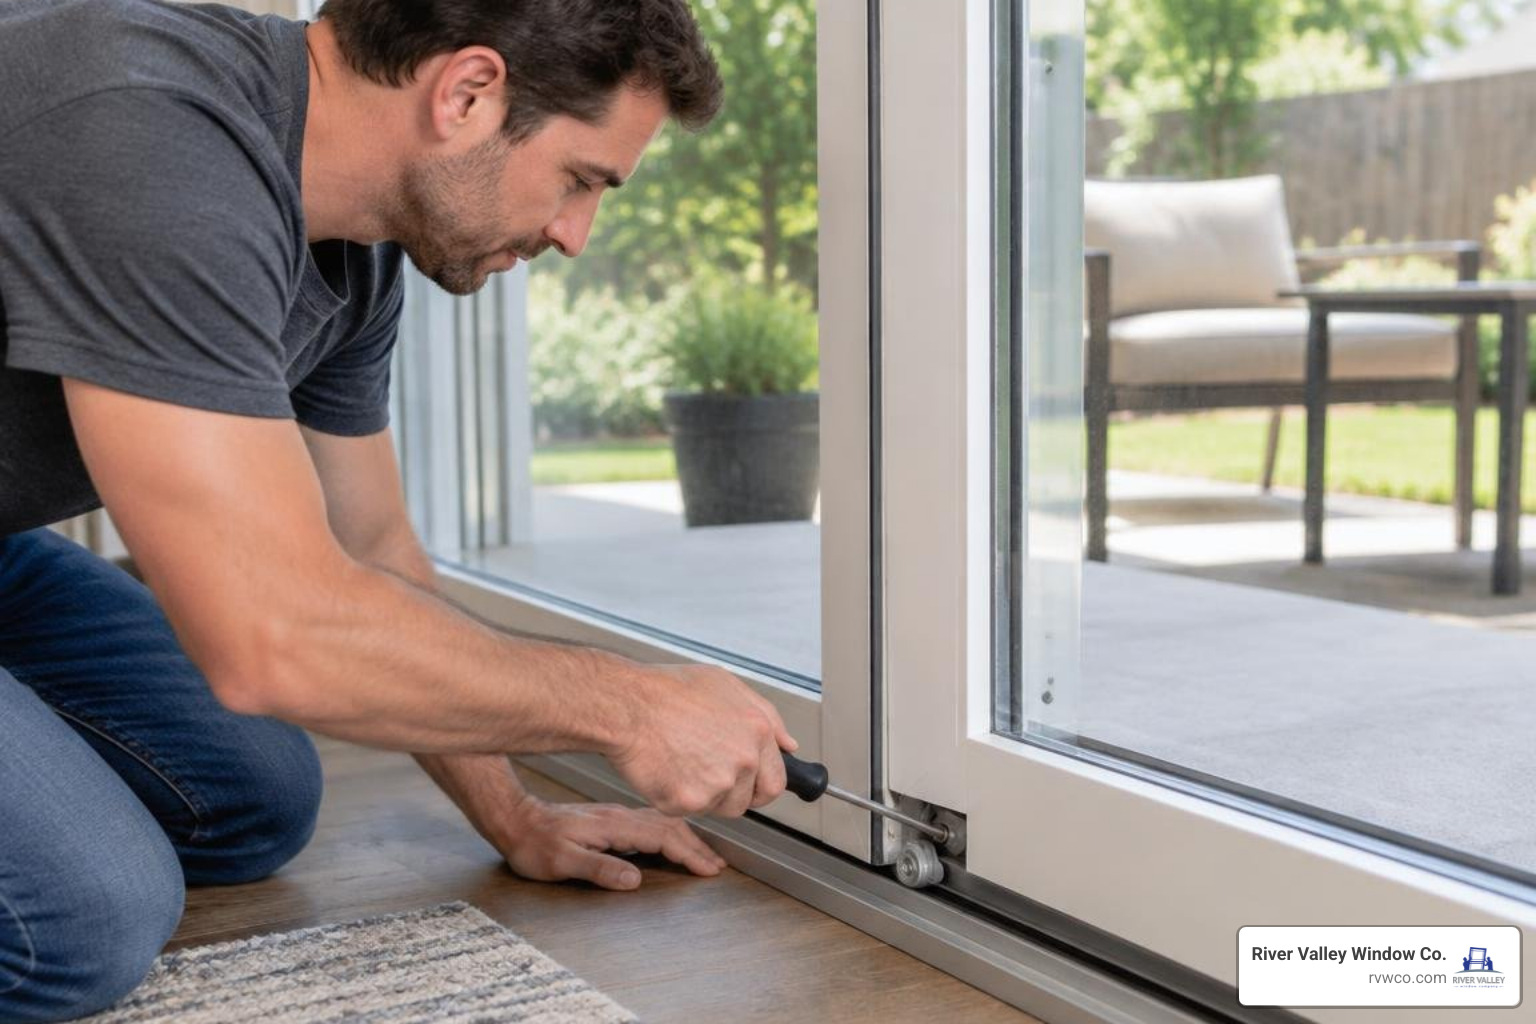
- Locate Adjustment Holes: Remove the vinyl roller adjustment plugs located near the bottom of the active panel’s vertical stiles.
- Relieve Weight: Slide a 4-inch stiff putty knife under the panel corner and lift slightly. Taking panel weight off the internal tandem rollers prevents stripping the adjustment mechanism.
- Turn the Screw: Insert a manual #3 Phillips screwdriver. Never use power drills or impact drivers here; they will strip the adjustment gearing. Turn clockwise to raise the panel, counter-clockwise to lower it.
- Check Reveals: Adjust both ends until the gap between the bottom rail and the sill track is a consistent 3/8 inch (.375″). Verify that the daylight reveal along the top head and side jamb remains consistent (between 1/8″ and 1/2″) across the entire travel path.
Strike Plate, Handle Set, and Mortise Lock Alignment
- Mortise Latch Centering: Close the door slowly to inspect where the mortise latch hook strikes the jamb-mounted keeper.
- Strike Adjustment: Loosen the strike plate screws. Tighten the middle adjustment screw first to dial in horizontal reach, followed by the top and bottom mounting screws. This sequence prevents warping the strike plate.
- Snib & Lock Engagement: Test the interior thumb turn (snib). When properly adjusted, the hook should pull the door tight against the weatherstripping without requiring hard physical pressure against the handle.
Screen Door Installation and Roller Tensioning
- Screen Track Insertion: Feed the top screen guide wheels into the upper screen channel. Compress the bottom spring-loaded rollers with a putty knife and guide them onto the bottom screen track.
- Tension Screws: Turn the tension screws on the screen stile edges clockwise until the screen hangs square with the outer frame.
- Latch Check: Adjust the screen keeper catch so the latch clicks securely into place without rattling.
Troubleshooting Common Installation Errors and Weatherproofing Verification
Even minor oversights during installation can lead to common service callbacks:
- Panel Drags on Sill: The frame sill is either crowned in the middle or the tandem rollers are adjusted too low. Relieve panel weight and raise both rollers clockwise.
- Door Bounces Back When Closed: The jamb is racked out-of-plumb or the rubber bumper is misaligned. Re-check diagonal squareness and adjust the perimeter shimming.
- Air or Water Leaks at Interlock: The anti-lift block or weatherstrip piles are missing. Ensure snap-on interlock strips engage fully along the vertical edge when the door is closed.
- Weep Testing: Pour a cup of water into the sill track. Water should quickly exit out through the exterior sill weep slots. If water pools, check for sealant blockage or debris.
Warranty Safeguards and Protection
Proper installation protects your manufacturer coverage. When reviewing your custom sliding doors with Milgard warranty, keep Milgard’s tiered warranty structure in mind:
- Standard Limited Lifetime Warranty: Protects against manufacturing defects under normal residential occupancy. For owner-occupied single-family homes, this covers frame and basic component defects. If ownership transfers, it converts to a 10-year parts-only warranty calculated from the original manufacture date, including 10-year hardware coverage and product-specific finish limitations.
- Full Lifetime Warranty Upgrade: An optional paid upgrade valid for the natural lifetime of the original consumer owner (non-transferable). It covers both replacement parts and repair labor. It includes accidental glass breakage coverage on Tuscany® Series V400 and V450 sliding doors, while Trinsic™ Series V300 requires a separate glass breakage add-on.
- Specific Time Limits: Both warranty tiers limit coverage to 10 years for insulated glass unit (IGU) delamination, internal blind defects, and factory exterior finish fading or peeling. A 1-year limit applies to weatherstripping, insect screens, and surface corrosion on stainless steel hardware.
Frequently Asked Questions About Installing Milgard Sliding Doors
How do I adjust the bottom rollers on a Milgard sliding patio door?
Pop out the vinyl access plugs at the base of the moving panel stile. Relieve panel weight with a pry bar or wide putty knife, then insert a manual #3 Phillips screwdriver into the lower access hole. Turn clockwise to raise that side of the door or counter-clockwise to lower it until reveals are square.
What type of sealant and insulation foam should be used for Milgard doors?
Always use a 100% neutral-cure structural silicone (such as Dow Corning 795) for the sill bed and frame joints. For cavity insulation between the vinyl frame and wall framing, use low-expansion polyurethane foam certified under AAMA 812. High-expanding foams exert pressure that bows vinyl jambs.
Why is my sliding glass door sticking or difficult to lock after installation?
This usually stems from uneven sill shimming, an out-of-plumb jamb, or roller height imbalance. If the panel is tilted even 1/8″, the mortise latch hook will strike the keeper plate off-center. Re-level the rollers and adjust the strike plate center screw to align latch engagement.
Professional Results That Last a Lifetime
Installing a sliding glass patio door requires patience, structural accuracy, and careful weatherproofing. By setting a flat sill, assembling corners with sealant, securing fasteners without warping jambs, and properly adjusting rollers, you ensure smooth operation and long-term energy efficiency.
When you want expert assistance in Lake Havasu City and across Northwestern Arizona, trust River Valley Window Co. We specialize in fast, non-invasive installations of energy-efficient Milgard patio doors to ensure your investment operates smoothly and stays protected under warranty for decades to come.