

What Door Installation Really Costs — and How to Find Out Fast
Door installation costs vary more than most homeowners expect. Here’s a quick breakdown before we dive in:
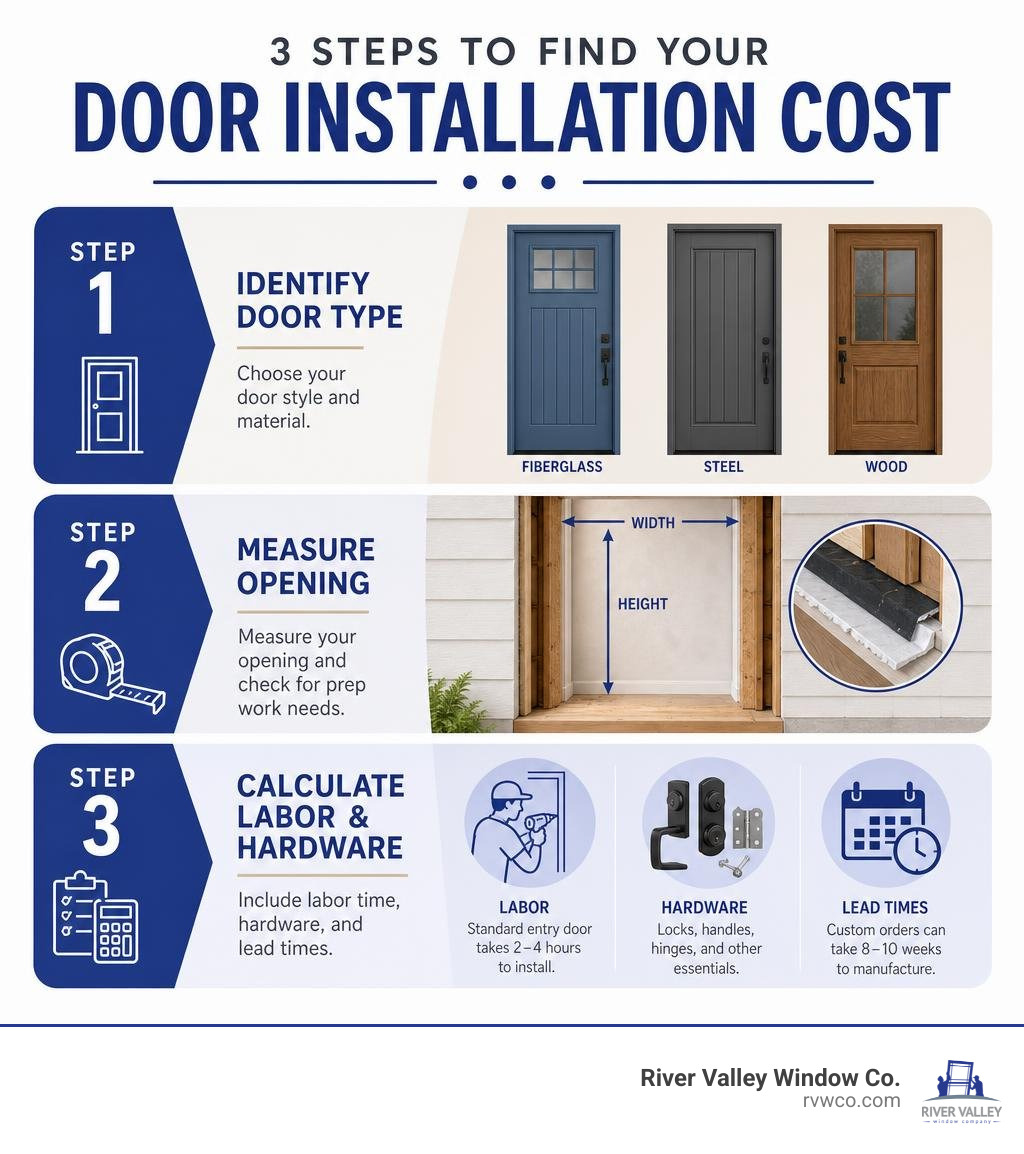
3 Steps to Find Your Door Installation Cost:
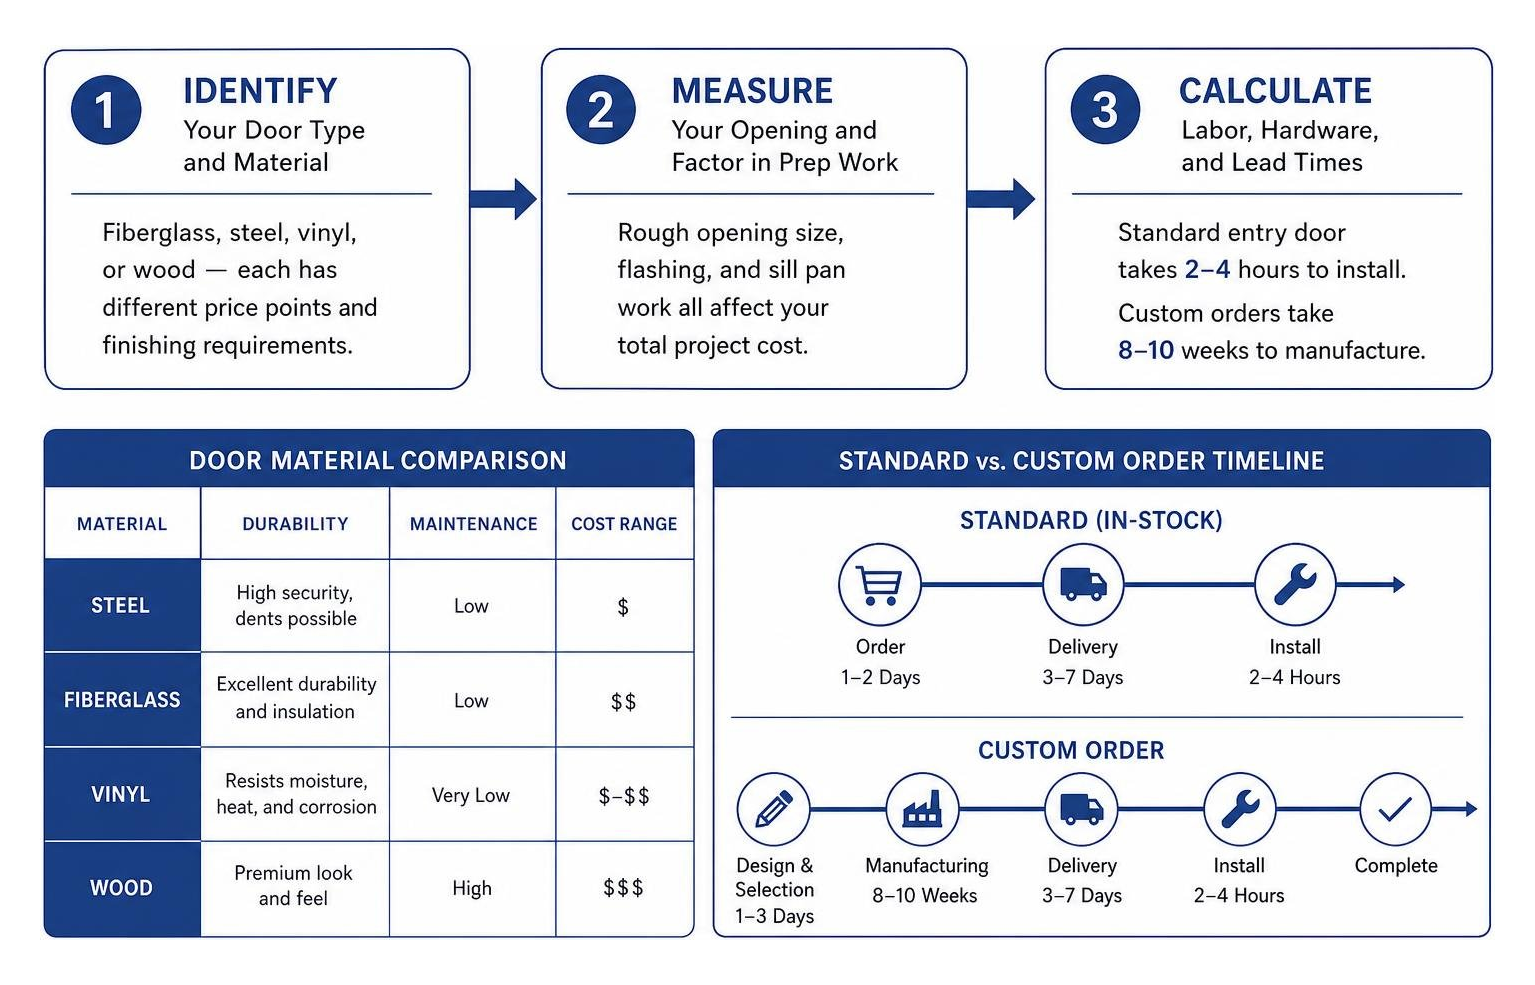
- Identify your door type and material — fiberglass, steel, or wood each carry different price points and finishing requirements
- Measure your opening and factor in prep work — rough opening size, flashing, and sill pan work all affect your total
- Calculate labor, hardware, and lead times — a standard entry door takes 2–4 hours to install; custom orders can take 8–10 weeks to manufacture first
If your home has old, drafty doors, you’re likely paying for it every month. A poorly sealed door can account for up to 15% of your heating bill — a real problem in Northwestern Arizona where summers are brutal and energy bills climb fast.
Replacing a door sounds simple. But the actual cost depends on a handful of factors most people don’t think about until they’re already mid-project: the type of door, the condition of the rough opening, local labor rates, and whether your door needs custom manufacturing.
This guide walks you through 3 simple steps to get a clear, realistic cost estimate — so there are no surprises on install day.
Step 1: Identify Your Door Type and Material Specifications
The first step in pinpointing your total project cost is deciding on the style of door and the construction material that fits your budget, design goals, and functional needs. Material selection plays one of the largest roles in determining overall Everything You Need to Know About Door Replacement Cost.
When choosing between fiberglass, steel, vinyl, and wood, you are balancing upfront investment against long-term maintenance and durability.
- Steel doors offer superior security and are generally the most budget-friendly upfront option, though they can dent or feel hot under intense desert sun exposure.
- Fiberglass doors provide an exceptional middle ground for durability, insulation, and architectural beauty. They can mimic natural wood grain without warping or rotting.
- Vinyl doors (especially common in sliding patio door systems) resist decay, coastal salt air, and Southwestern heat without flaking or needing repainting.
- Solid wood doors deliver a luxury aesthetic but sit at a premium price point and require significant routine upkeep to prevent moisture damage and sun fading.
Another crucial cost variable is whether you are buying a off-the-shelf unit or placing a custom order. Standard door units are usually stocked locally, but custom sizes, special colors, or high-performance glass packages take 8 to 10 weeks to manufacture before installation day. Avoid Common Mistakes Homeowners Make When Choosing a New Door by planning ahead so custom manufacturing lead times do not delay your home renovation schedule.
Prehung Exterior vs. Interior Door Installation Differences
A major factor influencing door installation labor and material pricing is whether you are installing a prehung exterior unit or an interior passage door.
A prehung door unit comes factory-assembled with the door slab already hinged inside a frame, complete with threshold and weatherstripping. However, exterior and interior prehung installations have vastly different specifications:
| Feature Specification | Exterior Prehung Door | Interior Prehung Door |
|---|---|---|
| Rough Opening Width | Frame width + 3/4 inch | Unit width + 1/2 inch |
| Rough Opening Height | Frame height + 1/2 inch | Unit height + 1/2 inch |
| Weatherization | Sill pan, flashing, threshold seal, full weatherstripping | Not required (interior climate) |
| Frame Clearances | 1/8 inch uniform reveal around frame | 1/16 to 1/8 inch reveal; HVAC undercut clearance |
| Average Labor Time | 2 to 4 hours (Single), 4 to 6 hours (Patio) | 0.5 to 1.5 hours per door |
Exterior doors demand tight weatherstripping, adjustable threshold seals, heavy-duty deadbolt strike plates, and inswing or outswing hardware configurations designed to resist wind-driven rain and extreme temperatures. Interior doors, by contrast, focus primarily on plumb alignment, smooth latching, and maintaining proper floor clearance for HVAC airflow.
Material Selection: Fiberglass, Vinyl, Steel, and Wood Finishing Rules
To ensure your new door maintains its full manufacturer warranty coverage, you must adhere strictly to specified finishing rules during or immediately after installation. Neglecting proper paint or stain finish can void your warranty entirely.
- Smooth and Woodgrain Fiberglass Doors: Must be finished with high-quality exterior grade acrylic latex paint or specialized stain systems on all exposed surfaces.
- Steel Entry Doors: Require prompt painting on all edges using rust-inhibiting exterior paint to prevent edge corrosion.
- Exterior Wood Doors: Must be sealed and coated on all six sides—the front face, back face, top edge, bottom edge, and both side edges—before or immediately after installation.
- Protective Overhang Depth: For exterior wood doors to remain fully covered under warranty in harsh weather, standard rules dictate that your home’s protective roof overhang depth must equal or exceed the vertical distance from the threshold base to the overhang underside.
Applying these finishing standards protects your investment against moisture intrusion, finish peeling, and thermal warping. Learn more about How to Protect Your Doors from Harsh Weather Conditions to preserve your entry system for decades.
Step 2: Measure the Opening and Factor in Prep Costs
Accurate measurements prevent costly install-day surprises. If a rough opening is sized incorrectly or severely out of square, additional framing work will quickly increase your labor invoice.
When sizing a rough opening for a prehung entry door, rely on standard clear space guidelines:
- General Rule of Thumb: The rough opening should be approximately 3/4 inch wider and 1/2 inch taller than the outer dimensions of the prehung frame unit (or about 2 inches wider and 2-1/2 inches taller than the bare door slab itself).
- 36″ x 80″ Door Slab: Requires a rough opening of approximately 38″ x 82-1/2″.
- 32″ x 80″ Door Slab: Requires a rough opening of approximately 34″ x 82-1/2″.
- Interior Prehung Units: Require a rough opening clearance that is 1/2 inch wider and 1/2 inch taller than the prehung frame unit.

Always measure the rough opening width across the top, middle, and bottom, and height along both the left and right sides. Record the smallest measurements to ensure your new unit fits inside without binding. Take time to review all structural Factors to Consider Before Installing New Doors prior to ordering custom frame dimensions.
Checking Square, Level, and Plumb Tolerances
Before setting a door frame, the rough framing studs and subfloor must be inspected for plumb, level, and squareness. Out-of-plumb framing forces extra shimming and can cause doors to swing open or shut on their own.
- Check Squareness: Measure diagonally from the top left corner to the bottom right corner, and from top right to bottom left. The maximum allowable difference between diagonals is 1/4 inch.
- Check Level and Plumb: Place a 4-foot level against the side jamb studs and across the bottom subfloor sill plate. The maximum allowable deviation from level or plumb across the opening is 1/8 inch.
- Inspect Corner Twist: Ensure the wall studs sit in a flat vertical plane. Corner-to-corner twist across the rough opening framing must not exceed 1/8 inch, or the door jamb will twist when fastened.
Critical Flashing, Sill Pans, and Weatherproofing Prep
Water management is the single most critical aspect of an exterior door installation. Installing high-grade weatherproofing components adds a small amount to material costs up front but saves thousands of dollars in water damage repair down the road.
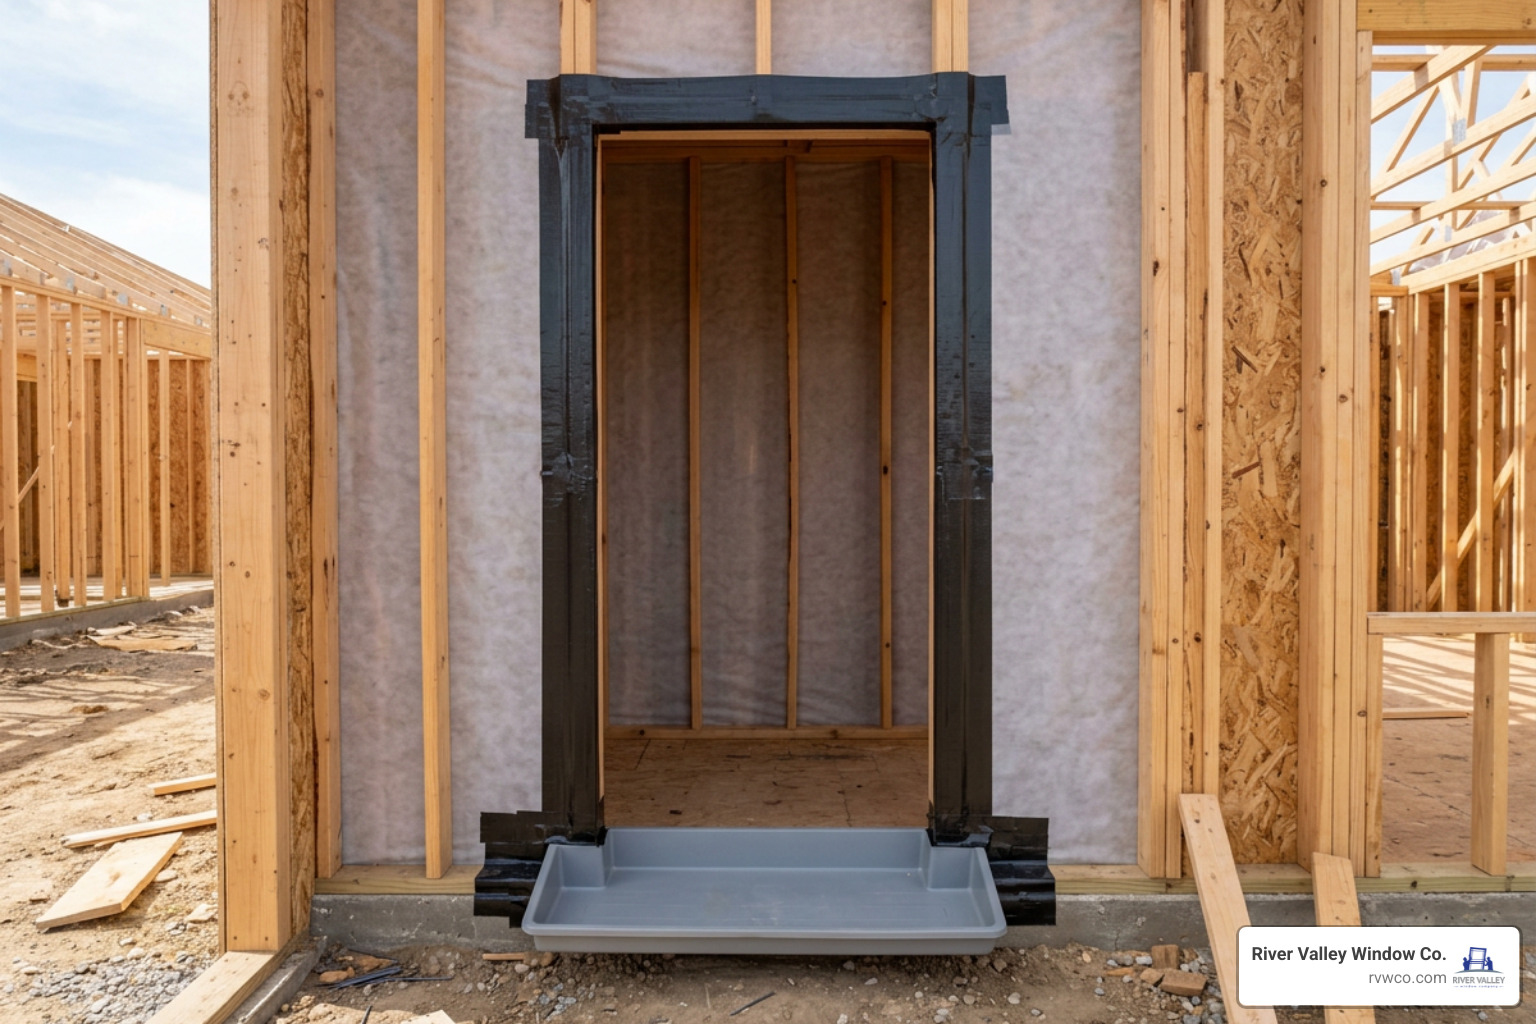
Proper weatherproofing follows standard AAMA guidelines and a strict sequencing method:
- Rigid Sill Pan Installation: Position a rigid sill pan with minimum 2-inch end dams directly on the subfloor sill plate, embedded in two rounded 3/8-inch beads of high-grade sealant.
- Sealant Placement: Apply continuous 3/8-inch sealant beads across the subfloor and extend them up both side jamb framing studs to a height of at least 12 inches.
- Flashing Sequence: Cut a 45-degree temporary flap in the exterior weather resistant barrier (WRB) above the head opening. Apply self-adhered flashing over the side jamb flanges first (extending above the head opening), then layer self-adhered flashing across the head flange, folding down the WRB flap over the head flashing to maintain shingle-lap drainage order.
- Drip Caps: Install a metal drip cap along the top head frame. Never caulk the top edge of a drip cap or the bottom weep drainage holes of a threshold sill pan, as water must be allowed to drain freely.
Discover more details on Weatherproofing Your Home the Role of Quality Doors to keep moisture and extreme heat outside where they belong.
Step 3: Calculate Labor, Hardware, and Door Installation Procedures
Labor cost is directly tied to the complexity of the door system and the time needed to achieve precise mechanical alignment.
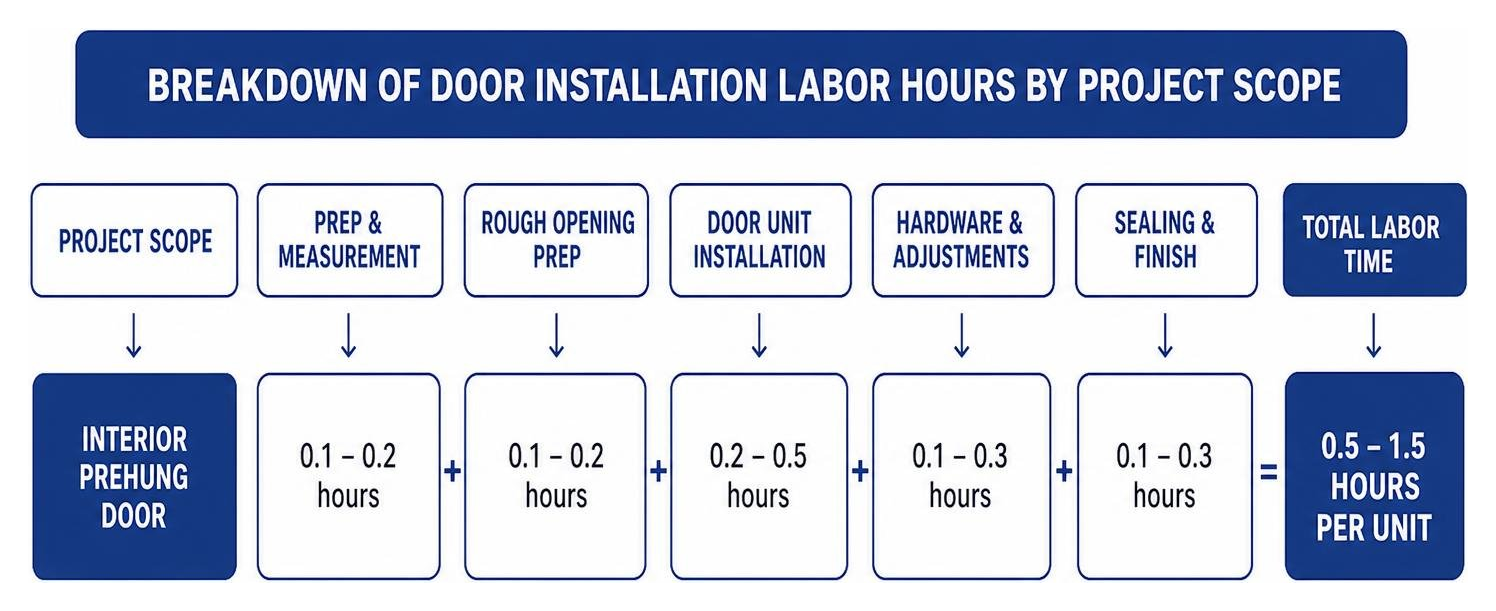
Understanding common installation timeframes helps you evaluate contractor quotes accurately:
| Project Scope | Estimated Installation Time | Complexity Level |
|---|---|---|
| Interior Prehung Door | 0.5 to 1.5 hours per unit | Beginner to Intermediate |
| Standard Single Entry Door | 2 to 4 hours | Intermediate to Advanced |
| Sliding Patio Door System | 4 to 6 hours | Professional Recommended |
| Multi-Panel Moving Glass Wall | 6 to 10+ hours | Professional Required |
To complete a professional installation, specific tools and materials are essential:
- 4-foot precision level and torpedo level
- Wooden or composite shims
- 3-inch corrosion-resistant structural wood screws
- 10d finish nails and trim punch
- Rigid sill pan and self-adhered flashing tape
- AAMA 812 compliant low-expansion window and door foam
- High-grade exterior elastomeric polyurethane sealant
- Cordless drill, hammer, utility knife, and protective safety gear
Setting, Shimming, and Insulating the Jamb Gap
Once opening prep is complete, setting the prehung door requires careful shimming sequence to secure the frame firmly without twisting or bowing the jambs.
Follow this professional installation sequence:
- Dry-Fit and Center: Place the bottom of the prehung unit onto the sill pan, tilt it forward into the rough opening, center it, and temporarily tack it in place at the top corners.
- Shim the Hinge Side First: Insert pair shims directly behind each hinge location on the hinge jamb. Adjust until the hinge jamb is perfectly plumb in two directions (front-to-back and side-to-side).
- Secure Hinge Anchors: Replace one short screw in the top and middle hinges with 3-inch heavy-duty security screws driven through the shims directly into the structural framing studs. This anchors the door frame securely and prevents long-term panel sagging.
- Shim Latch Side and Adjust Reveals: Shim behind the lock side jamb and head jamb. Maintain a uniform 1/8-inch reveal spacing between the door slab and frame along the entire top and side perimeters.
- Insulate the Perimeter Void: Fill the cavity between the jamb frame and framing studs using low-expansion polyurethane foam meeting AAMA 812 standards or loosely packed fiberglass insulation. Never use standard high-expansion foam, as its expansion force will bow the door jambs inward and jam the door slab shut.
Locksets, Strike Plate Adjustments, and Troubleshooting
The final phase of installation focuses on mounting functional hardware and fine-tuning mechanical operation.
- Lockset and Deadbolt Alignment: Install deadbolts and handle locksets into pre-bored holes. Drive long 3-inch reinforcement screws through the deadbolt strike plate directly into wall studs to maximize kick-in security.
- Testing Threshold Tension (The Paper Test): Place a sheet of paper over the threshold sill cap, close the door, and pull the paper. You should feel firm, even resistance without tearing the paper. If the fit is loose or too tight, turn the threshold sill cap adjustment screws clockwise to raise or counterclockwise to lower the threshold seal.
- Weatherstrip Compression Checks: Verify even weatherstrip compression along the lock jamb to confirm the door frame is completely square without vertical twist.
- Troubleshooting Common Issues:
- Door sticks or rubs at the top lock corner: Tap shims deeper behind the bottom hinge or tighten hinge screws to draw the panel plumb.
- Door fails to latch: Adjust the latch strike plate horizontally or file the strike plate opening slightly until the latch bolt extends fully.
- Uneven reveal gaps: Tap the frame lightly with a mallet after loosening temporary fasteners, readjust shims, and re-fasten.
Upgrading hardware and frame anchors significantly boosts structural strength. Learn more about How Modern Doors Improve Home Security and Comfort for your family.
Frequently Asked Questions About Door Installation
How long does a standard door installation take?
A standard single exterior entry door installation takes between 2 and 4 hours for an experienced installer, assuming no major structural framing repairs are required. Installing larger sliding patio doors takes approximately 4 to 6 hours. If you are ordering a custom door size or specialized finish, manufacture lead times typically take 8 to 10 weeks prior to installation day.
Why must you use low-expansion foam for frame insulation?
Standard expanding spray foam expands forcefully as it cures, generating high pressure that can easily bow door jambs inward, misalign strikes, and render the door inoperable. You must always use low-expansion polyurethane foam compliant with AAMA 812 standards (specifically labeled for windows and doors) or fiberglass insulation. Fill no more than 50% of the perimeter cavity with foam to allow safe expansion.
How do drafty doors impact heating bills and HVAC performance?
Unsealed, drafty doors account for up to 15% of residential heating and cooling loss. Gaps around worn weatherstripping or out-of-square thresholds force your HVAC system to work continuously, increasing utility expenses and placing undue wear on cooling equipment during high-heat months.
Conclusion
Finding your total door installation cost comes down to three steps: choosing your door material, taking precise rough opening measurements to evaluate prep work, and factoring in labor, weatherproofing materials, and hardware.
At River Valley Window Co., we specialize in high-performance replacement doors tailored specifically to Northwestern Arizona’s climate. Serving Lake Havasu City, AZ, and surrounding communities, our expert team provides fast, non-invasive installations backed by industry-leading warranties.
We proudly install energy-efficient Milgard products designed to withstand intense Southwestern sun and heat. Milgard products feature a flexible coverage structure:
- Standard Limited Lifetime Warranty: Covers parts and hardware for residential installations. If transferred after home sale, it becomes a 10-year parts-only limited warranty calculated from the manufacture date, with product-specific finish and weatherstripping limits. Shorter limits apply: 10 years for insulated glass unit delamination, blind defects, and peeling or fading finishes; 1 year for weatherstripping, screens, and hardware corrosion.
- Paid Full Lifetime Warranty Upgrade: Valid for the natural lifetime of the original consumer owner (non-transferable), covering both parts and labor. Includes full glass breakage coverage on Tuscany® V400 and V450 series, while glass breakage coverage is available as an added upgrade option on Trinsic™ V300 series.
Ready to improve your home’s energy efficiency, curb appeal, and security? Explore Our Replacement Doors or contact River Valley Window Co. today to schedule your free, hassle-free consultation!