

Plan a Skylight Installation That Fits Your Roof and Budget
Skylight installation can bring daylight into a dark room, improve the feel of a space, and add ventilation when you choose an operable model. For most homes, it is a professional project because it requires cutting and framing the roof, integrating waterproof flashing, and safely working at height.
Here is the quick answer homeowners need:
| Question | Quick answer |
|---|---|
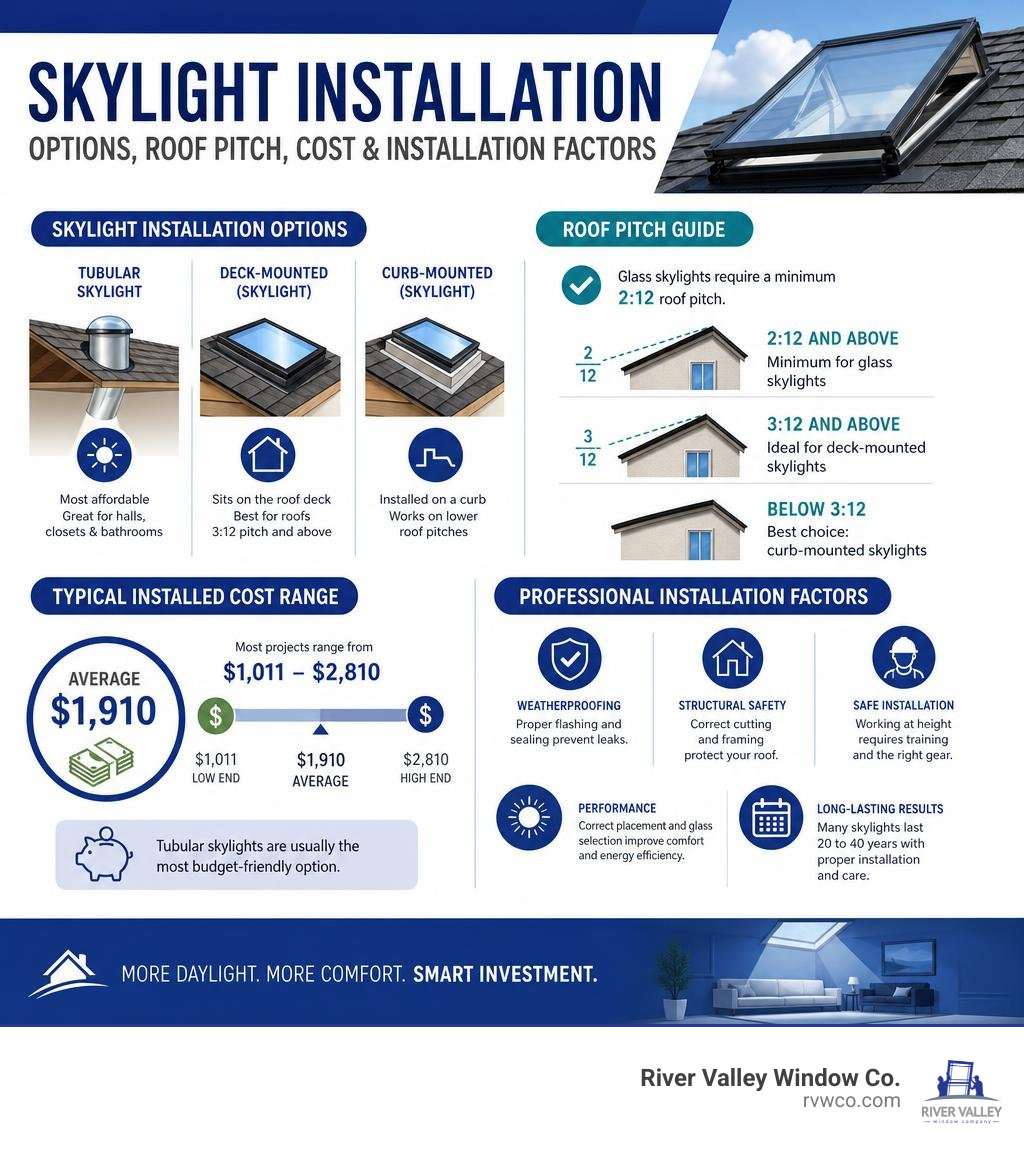
| What does installation cost? | Most projects cost about $1,011 to $2,810, with an average near $1,910. |
| Which skylight is most affordable? | Tubular skylights usually cost less and work well for halls, closets, and bathrooms. |
| Does roof pitch matter? | Yes. Glass skylights need at least a 2:12 roof pitch. Deck-mounted units generally suit roofs above 3:12, while curb-mounted models can work on lower slopes. |
| Can I install one myself? | Only highly skilled DIYers should consider it. Most homeowners should hire a qualified installer to protect the roof structure and prevent leaks. |
| How long do skylights last? | Many last 20 to 40 years; premium models may last longer with correct installation and maintenance. |
For Northwestern Arizona homes, the right glass, roof placement, shading, and seal details matter as much as the purchase price. A well-planned skylight can add useful natural light without creating unnecessary heat gain or future roof repairs.
This guide compares practical skylight options, realistic costs, and the installation details that help you make a budget-smart choice.
Skylight Types and Suitable Roof Pitches
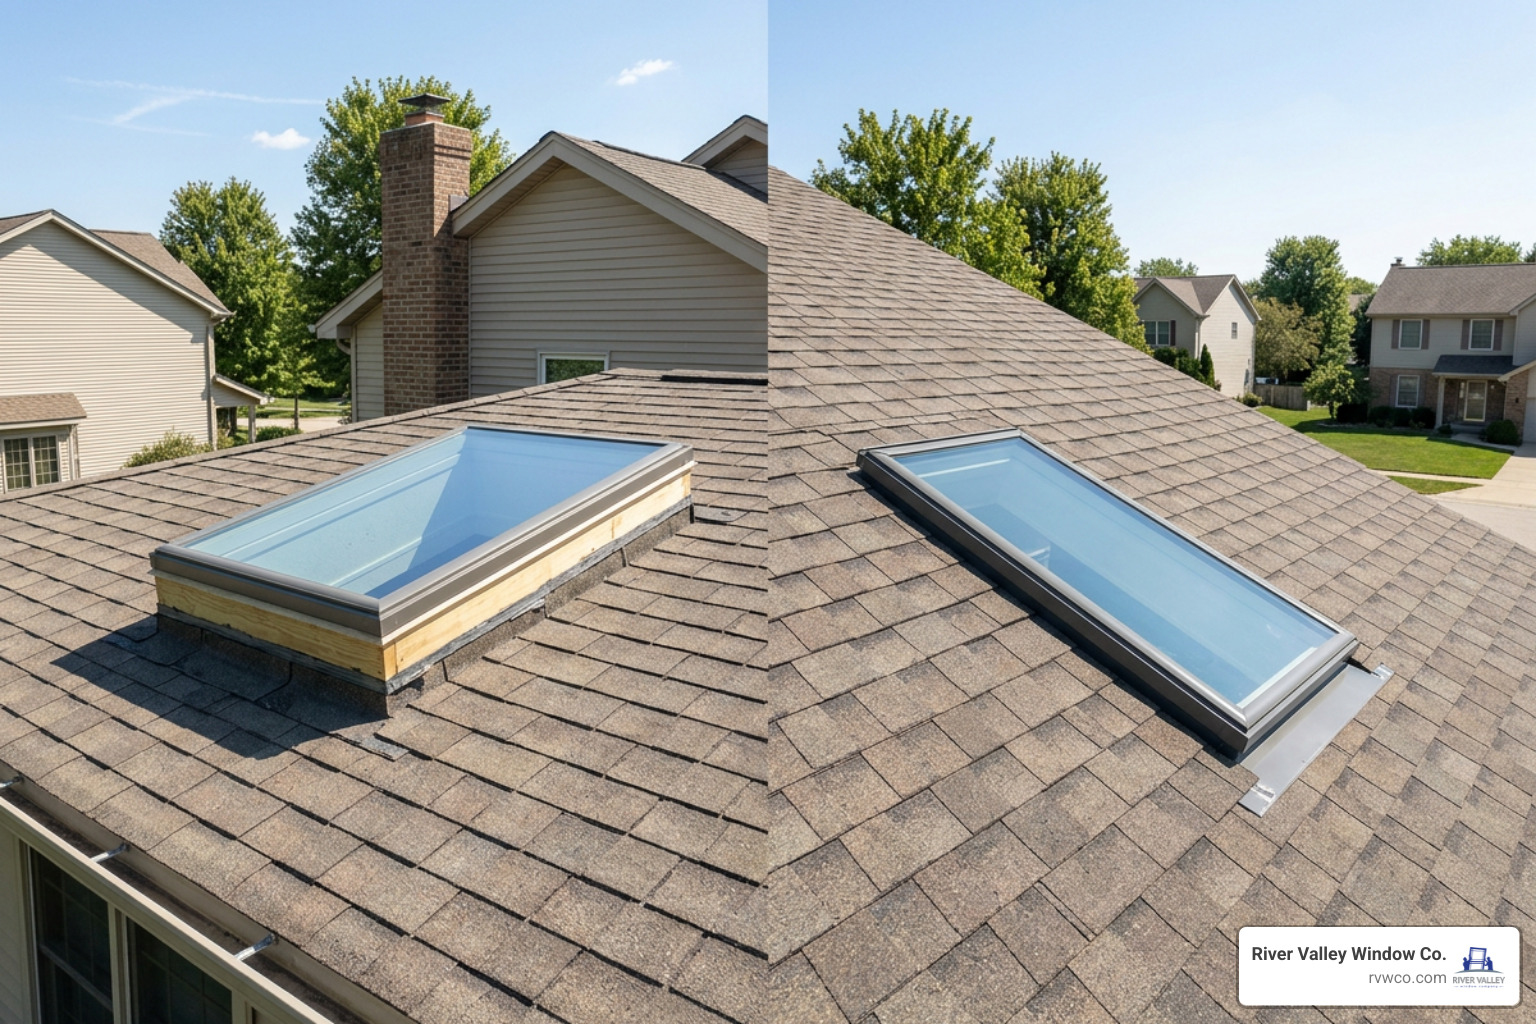
When selecting the ideal daylighting option for your home, understanding how different models function on various roof shapes and slopes is essential. The angle or pitch of your roof plays a major role in determining which unit will maintain long-term weatherproofing. Roof pitch is expressed as a ratio of vertical rise to horizontal run (for example, a 3:12 pitch rises 3 inches for every 12 inches of horizontal distance).
If you are evaluating whether overhead daylighting fits your home layout, exploring How Sun Tunnels and Skylights Improve Your Home provides great context on how natural illumination transforms interior living spaces.
| Skylight Type | Typical Material Cost | Suitable Roof Pitch | Primary Best Use |
|---|---|---|---|
| Fixed Glass | $200 – $900 | 2:12 minimum (3:12+ deck-mount) | Living rooms, kitchens, vaulted ceilings |
| Venting Glass | $400 – $2,000 | 2:12 minimum | Bathrooms, kitchens needing air circulation |
| Tubular (Sun Tunnel) | $200 – $500 | Flat to steep pitches | Hallways, walk-in closets, powder rooms |
| Curb-Mounted | $150 – $800 | Below 3:12 (and flat roofs) | Low-sloped roofs or replacement on existing curbs |
| Deck-Mounted | $250 – $1,200 | Above 3:12 (14° to 85°) | Low-profile aesthetic on standard pitched roofs |
Fixed and Venting Glass Skylights
Fixed skylights are sealed, non-opening units designed purely to admit visual sunlight and sky views. Because they contain no moving sash components, they are generally less expensive to purchase and carry fewer moving parts that could require maintenance over time. Material costs for fixed glass units generally range between $200 and $900.
Venting skylights, on the other hand, open outward to let warm interior air escape while drawing in fresh outdoor breeze. This chimney effect works exceptionally well in humid or heat-prone areas like kitchens and bathrooms. Venting models come in several operational designs:
- Manual Operation: Opened using a hand crank or an extension pole for overhead units.
- Electric Controls: Powered by household wiring and operated via wall switch or remote control.
- Solar-Powered Vents: Feature a built-in solar panel and wireless control pad. These units require no electrician wiring labor and often qualify for solar energy tax credits.
When opting for venting glass in regions with intense solar heat like Northwestern Arizona, selecting low-emissivity (Low-E) insulated glass coatings and proper tinting prevents excessive heat gain during summer months.
Curb-Mounted vs Deck-Mounted Models
The structural attachment method determines how a unit integrates with your roof deck:
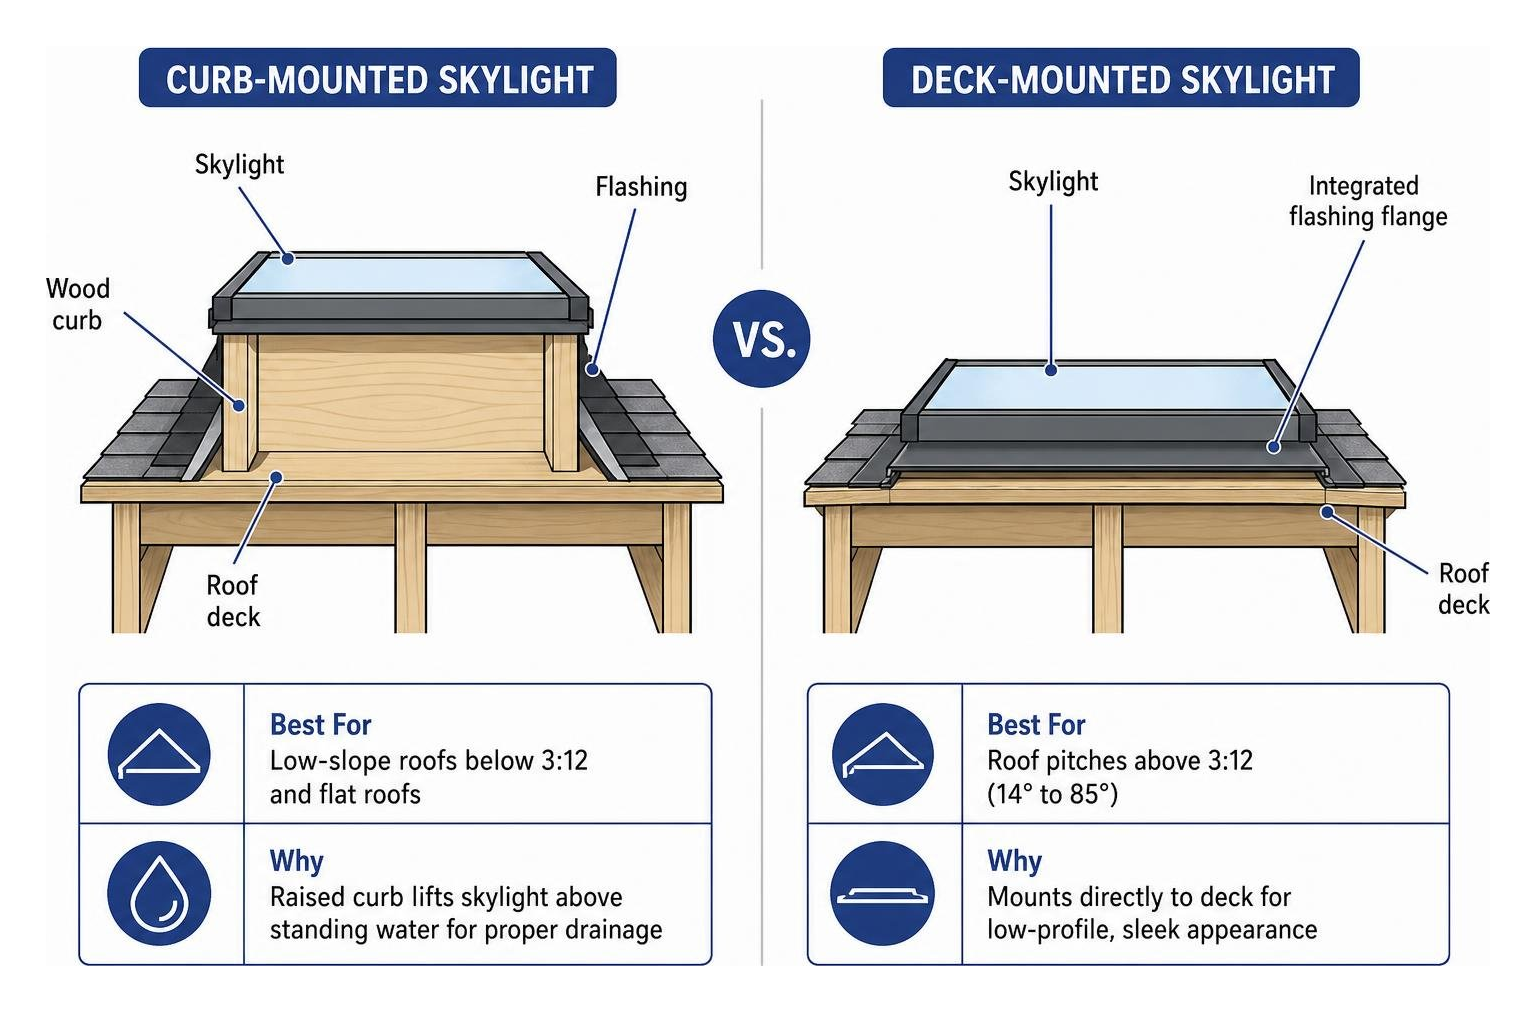
- Curb-Mounted Skylights: The frame sits on top of a raised wooden curb (typically built from 2×4 or 2×6 lumber) that is attached to the roof opening. The skylight fits over the curb like a shoe-box lid. Curb mounting is mandatory for roofs with low pitches below 3:12 (or 14 degrees) and flat roofs, as the raised wooden frame raises the glass above sitting water, shedding rain safely away.
- Deck-Mounted Skylights: These units mount directly to the structural plywood roof deck with integrated metal attachment flanges. Deck-mounted designs lie closer to the roofline, offering an attractive, low-profile exterior appearance. They require a minimum roof slope above 3:12 to ensure proper drainage down the surrounding shingle pattern.
Tubular Skylights and Sun Tunnels
Tubular skylights—often called sun tunnels or solar tubes—capture daylight through a clear acrylic dome on the roof and reflect it down a highly reflective metal pipe into a ceiling diffuser.
Because they require no major structural rafter re-framing, tubular skylights represent the most budget-friendly skylight installation pathway. Material expenses range from $200 to $500. They fit easily into narrow structural gaps between standard 16-inch or 24-inch ceiling joists. Rigid aluminum pipes deliver maximum light output over long runs, while flexible tubing allows installer workarounds past attic plumbing, electrical lines, or HVAC ducts up to 45-degree angles.
Skylight Installation Costs and Budget Breakdown

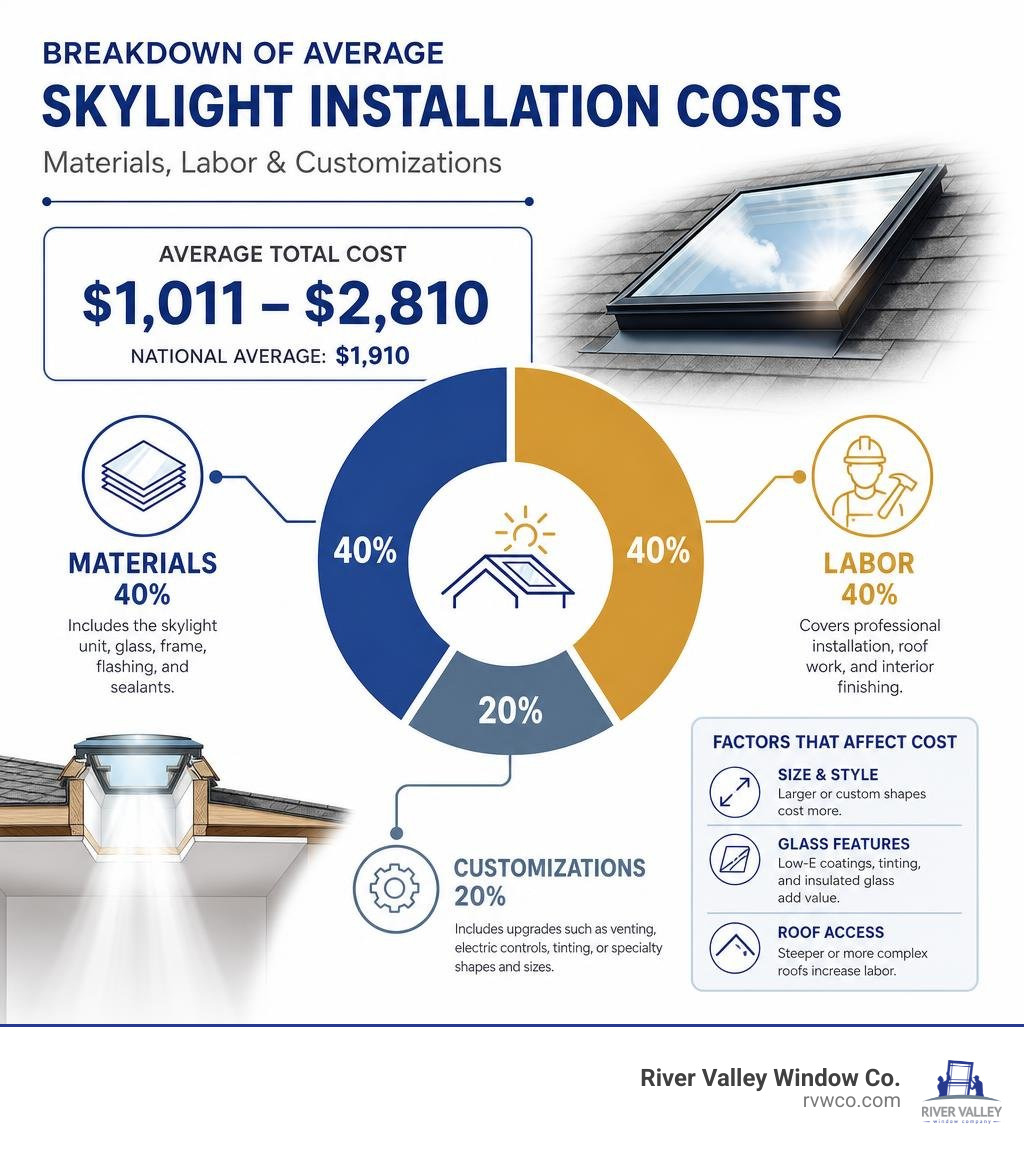
Budgeting for overhead daylighting requires looking at both the unit purchase price and the specialized trade labor needed for a safe, watertight install. The average total cost for skylight installation ranges between $1,011 and $2,810, with a national average landing near $1,910.
For additional perspective on how adding daylight creates long-term value and aesthetic appeal, review 4 Reasons You Need a Skylight.
Material, Size, and Style Pricing
Material costs vary significantly based on window size, glazing features, frame materials, and glass shapes:
- Standard Sizes (14×30 to 24×48 inches): $150 to $600 for base fixed glass units.
- Large Sizes (49×49 inches or wider): $500 to $1,900 for unit materials alone.
- Tubular Units: $200 to $500 complete with flashing kit, pipe, and ceiling lens.
- Custom Shapes and Impact Glass: $1,500 to $5,000 for customized shapes (such as pyramids or continuous ridge glass) or high-impact, shatter-resistant laminated glass.
Accessories like factory-installed solar blinds ($200 to $400) or insect screens ($10 to $50) for venting units add functionality while preserving indoor comfort.
Labor Costs and Trades Involved
Professional installation labor ranges from $300 to $2,500 per unit, depending on roof height, pitch steepness, roofing material (such as asphalt shingle vs. Spanish clay tile), and attic access. The total labor cost combines specific trade specialists:
- Roofers ($50 to $100 per hour): Cut roof decking, layer waterproof membrane, and interweave step flashing with existing shingles.
- Carpenters ($40 to $80 per hour): Frame the rough opening, install header support beams, and build interior light shaft wells.
- Window Specialists / Glaziers ($30 to $60 per hour): Set, level, and fasten the glass frame to ensure correct seal contact.
- Electricians ($50 to $100 per hour): Wire hardwired electric venting units or motorized wall switches.
Selecting solar-powered venting models bypasses the need for an electrician entirely, shaving $150 to $400 off total labor bills.
Key Planning Steps for Skylight Installation
Careful layout planning before making the first saw cut guarantees structural safety and optimal sunlight interior diffusion. If you are curious about local regional trends, see Why Are Skylights Becoming So Popular in Arizona to understand how homeowners optimize indoor sunlight exposure.
Key planning steps include:
- Verifying Local Building Codes: Obtain necessary building permits, especially when cutting structural roof trusses or changing ceiling framing.
- Checking Roof Orientation: South-facing roof placements provide continuous daytime illumination, while north-facing positions deliver softer, diffuse ambient light without harsh afternoon heat spikes.
- Locating Ceiling Joists and Rafters: Use a stud finder inside to mark framing locations. Standard roof rafters are spaced 16 inches or 24 inches on-center.
- Inspecting Attic Obstructions: Verify that no electrical wires, plumbing stacks, or air conditioning ducts cross the planned vertical light shaft path.
Professional vs DIY Skylight Installation
While experienced woodworkers can handle simple tubular skylights, installing traditional glass units is complex and carries notable risks for average DIYers.
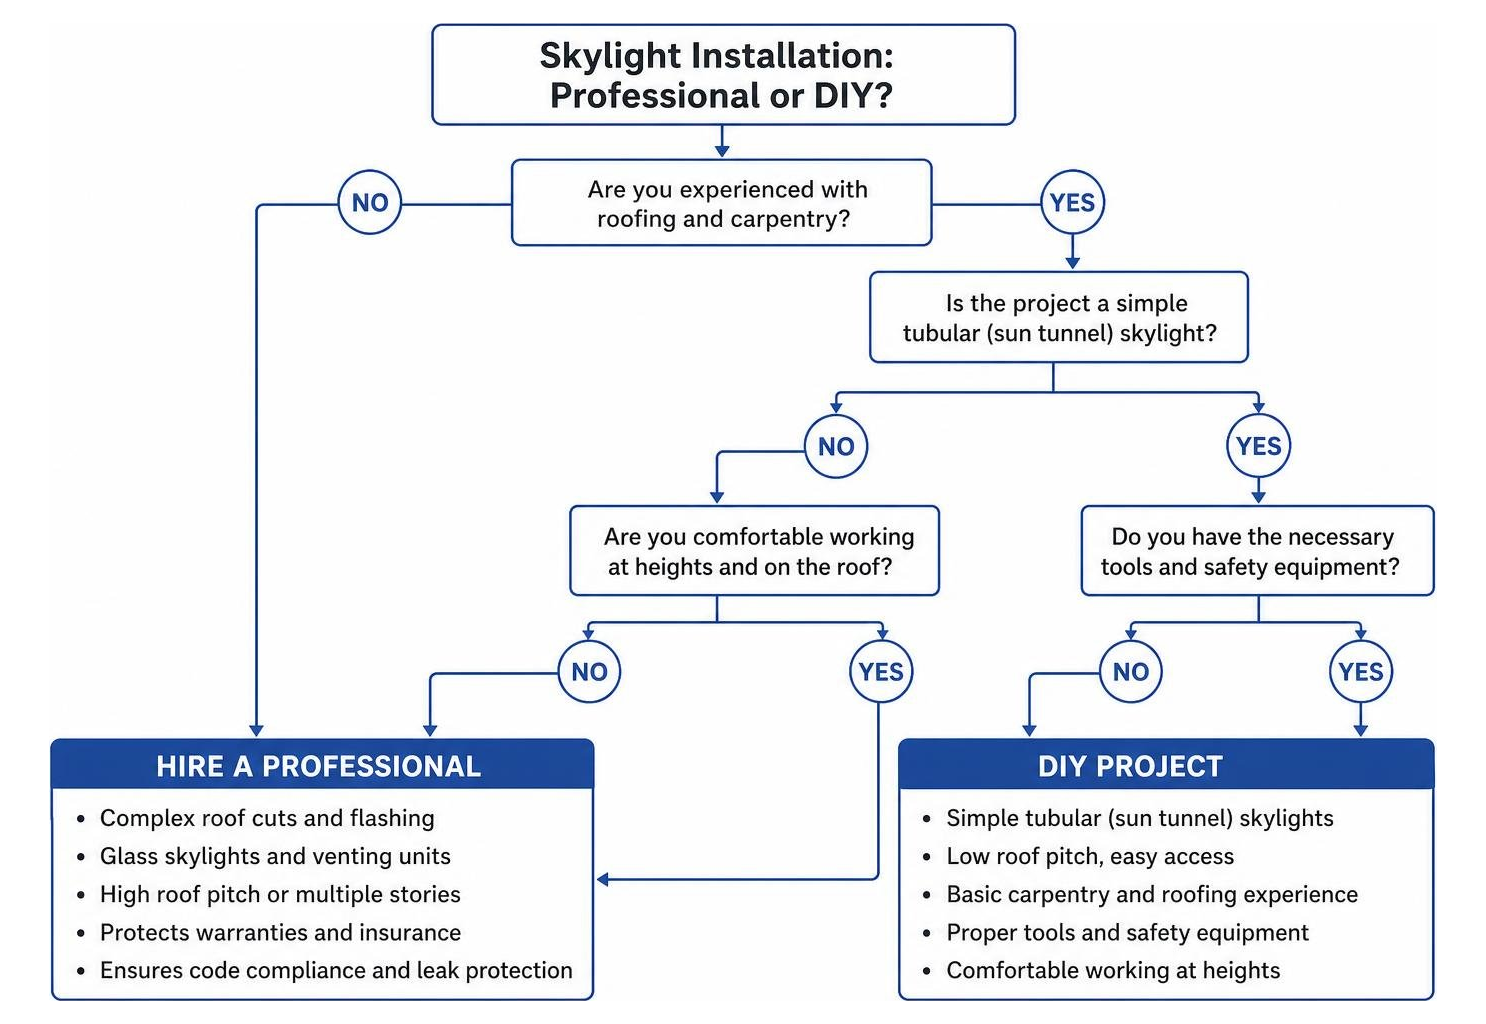
Hiring a licensed contractor protects your home warranty, secures proper insurance coverage, and guarantees that flashings withstand rain and wind. DIY framing errors can lead to sagging rooflines, continuous water leaks, or voided glass warranties.
Roof Safety Precautions and Personal Equipment
Working high on a roof surface requires strict adherence to safety protocols:
- Fall Arrest Protection: Always wear a fitted full-body safety harness attached to an anchored lifeline secured to a structural ridge beam.
- Footwear and Grip: Wear rubber-soled, slip-resistant footwear. Never walk on wet, frosty, or loose roofing material.
- Eye and Hand Safety: Use protective safety glasses and heavy-duty leather work gloves when cutting aluminum flashings, glass frame edges, or roof decking.
- Weather Awareness: Avoid roof work during high wind conditions or extreme summer afternoon temperatures.
Framing, Flashing, and Weatherproofing Guide
A watertight seal relies on layered flashing components that shed water down the roof incline. Correct layering prevents water from pooling behind framing wood.
Cutting Roof Openings and Structural Framing
Creating a structural roof cutout follows a strict sequence:
- From inside the attic, mark corner locations using double-checked measurements between rafters. Drive long screws up through the roof deck at each corner.
- Clear back exterior shingles and roofing felt at least 6 to 12 inches beyond the screw markers.
- Cut out the plywood decking using a circular saw set to the precise depth of the roof deck.
- Frame the rough opening using dimensional lumber matching existing rafters. Double-header framing pieces must be installed at the top and bottom of the cutout to transfer structural roof loads safely. Never cut engineered roof trusses without a structural engineer’s approval.
Framing and Flashing for a Sealed Skylight Installation
Proper weatherproofing relies on three sequential layers:
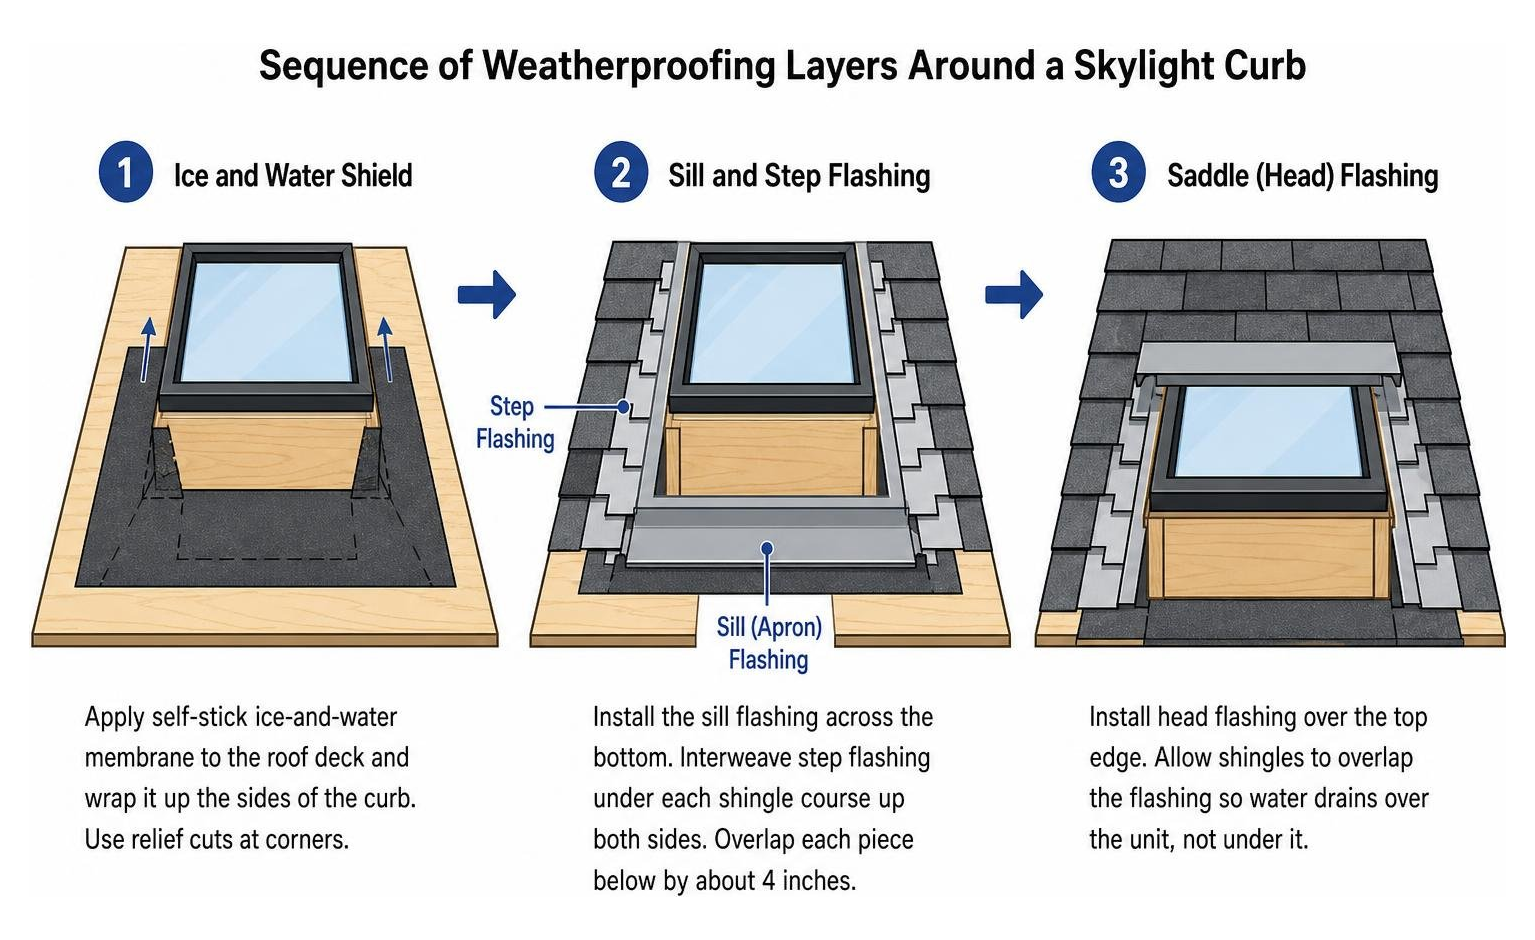
- Ice and Water Shield: Trim existing underlayment back 6 inches from the opening. Adhere self-stick ice-and-water membrane directly to the bare wood roof deck, wrapping it up the sides of the wooden curb frame with relief cuts at corners.
- Sill and Step Flashing: Install the metal apron/sill flashing across the bottom edge. Next, interweave individual L-shaped step flashing pieces under each row of asphalt shingles going up both sides of the frame. Each step flashing piece should overlap the piece below it by approximately 4 inches.
- Saddle (Head) Flashing: Mount the top head flashing over the top frame edge, allowing shingles to lay over the flashing metal so water drains over the unit rather than under it.
Interior Drywall Repair and Light Well Finishing
Once exterior roof seals are secured, focus shifts to completing the interior light shaft. If you are planning an overhead lighting project in a wet zone, see Upgrade Your Master Bathroom with Skylights for tips on light shaft planning and moisture protection.
- Constructing the Shaft: Build straight, splayed, or angled shaft walls from the roof curb down to the room ceiling joists. Splayed shaft walls (angled outward toward the interior room) spread daylight across a significantly wider floor area.
- Insulating the Light Shaft: Wrap the entire exterior surface of the drywall shaft in the attic space with fiberglass or rigid foam insulation. Uninsulated light wells create condensation when warm room air meets cold roof framing.
- Vapor Barrier Seal: Connect the room vapor barrier tightly to the skylight finish groove.
- Drywall and Finishing: Install drywall, tape joints, apply joint compound, sand smooth, and paint the light well white to maximize sunlight reflection into the living space. Finish with ceiling trim moulding.
Pros, Cons, and Resale Value Impact
Evaluating a major home upgrade involves balancing daily living benefits against ongoing home maintenance needs. For a deeper look at return on investment, review How Skylights Affect Home Resale Value What Buyers Look For and explore Why Your Home Needs More Natural Lighting.
Energy Ratings and Thermal Efficiency
Modern high-performance glass units keep interior temperatures comfortable year-round. Check the official National Fenestration Rating Council (NFRC) label for key performance metrics:
- U-Factor: Measures heat loss rate through the window assembly. Look for values between 0.25 and 0.50—lower numbers mean better insulation against extreme outdoor cold or heat.
- Solar Heat Gain Coefficient (SHGC): Measures the fraction of solar radiation admitted through the glass. In hot sunny climates like Lake Havasu City, an SHGC rating near or below 0.30 prevents uncomfortably warm interiors.
- Low-E Glass Coatings: Spectrally selective metallic layers reflect infrared radiation while permitting clear visible daylight to illuminate room finishes.
Long-Term Value and Maintenance Guidelines
A quality glass installation can last 20 to 40 years, with select premium units lasting up to 55 years. Follow these routine maintenance guidelines:
- Inspect perimeter rubber seal gaskets and sealant annually.
- Clean clear exterior glass surfaces using mild soap and water solutions; avoid harsh abrasive pads that scratch outer coatings.
- Clear debris (such as leaves, twigs, or dirt) from upper saddle flashing drains to ensure free water flow.
- Maintain interior wooden curb framing with paint or wood stain to protect against ambient moisture absorption.
When replacing windows and sliding glass doors throughout your home, pairing new overhead daylighting with energy-efficient window products creates a cohesive, energy-saving envelope.
At River Valley Window Co., we specialize in replacement window and door systems throughout Northwestern Arizona, including Lake Havasu City. We install high-performance products built to withstand severe desert heat and sun exposure.
When upgrading nearby home openings, understanding product protection gives lasting peace of mind. Current product warranties feature a tiered structure: a standard Limited Lifetime Warranty versus a paid Full Lifetime Warranty upgrade.
Under standard warranties, coverage limits vary depending on whether the installation involves new construction or replacement scope, as well as occupancy type. If a property is sold and transferred, the warranty becomes a 10-year parts-only limited coverage calculated from manufacture date, including 10-year hardware coverage alongside specific finish and weatherstripping limitations.
Specific shorter limits apply across standard product lines:
- 10-year coverage limits apply to insulated glass unit delamination, blind defects, and peeling or fading frame finishes.
- 1-year coverage limits apply to weatherstripping, insect screens, and corrosion on stainless steel hardware.
For maximum protection, opting for a paid Full Lifetime Warranty upgrade provides non-transferable coverage valid for the natural lifetime of the original consumer owner. It includes both parts and labor. Included within the Full Lifetime Warranty upgrade is full glass breakage coverage on premium lines like Tuscany® V400 and V450, while glass breakage coverage can be added as an optional upgrade on Trinsic™ V300 series products.
Frequently Asked Questions About Skylights
How long do installed skylights typically last?
Quality units typically last between 20 and 40 years. Lifespan depends heavily on local climate extremes, installation weatherproofing, and glass seal quality. Many homeowners align their replacement schedule with roof re-shingling projects to save on labor costs.
What minimum roof pitch is required for glass skylights?
Glass units require a minimum roof pitch of 2:12. Pitch ratios above 3:12 accommodate direct deck-mounted units, whereas pitch ratios below 3:12 require raised curb-mounted frames to shed rainwater effectively.
Can a skylight be installed on a flat roof?
Yes. Flat roof installations use raised wooden curbs (built at least 4 inches above the roof membrane surface) angled slightly toward the drainage path, or specially designed flat-roof acrylic dome units mounted over elevated framing. On spray polyurethane foam (SPF) or rolled flat roofs, specialized elastomeric sealants and reinforcement mesh seal the flashing base watertight.
Conclusion
Planning a smart overhead daylighting project comes down to selecting the right model for your roof pitch, balancing material costs against labor expenses, and choosing high-performance energy coatings. Whether you opt for an affordable tubular sun tunnel in a hallway or a dramatic solar-powered venting unit over a master bathroom, proper weatherproofing guarantees years of bright, worry-free daylighting.
When you are ready to upgrade your home’s natural light, energy efficiency, and window openings, work with experienced professionals who understand local structural codes and hot-climate energy requirements. Explore your home daylighting options with our team at Skylights and contact River Valley Window Co. to schedule a free project consultation!